

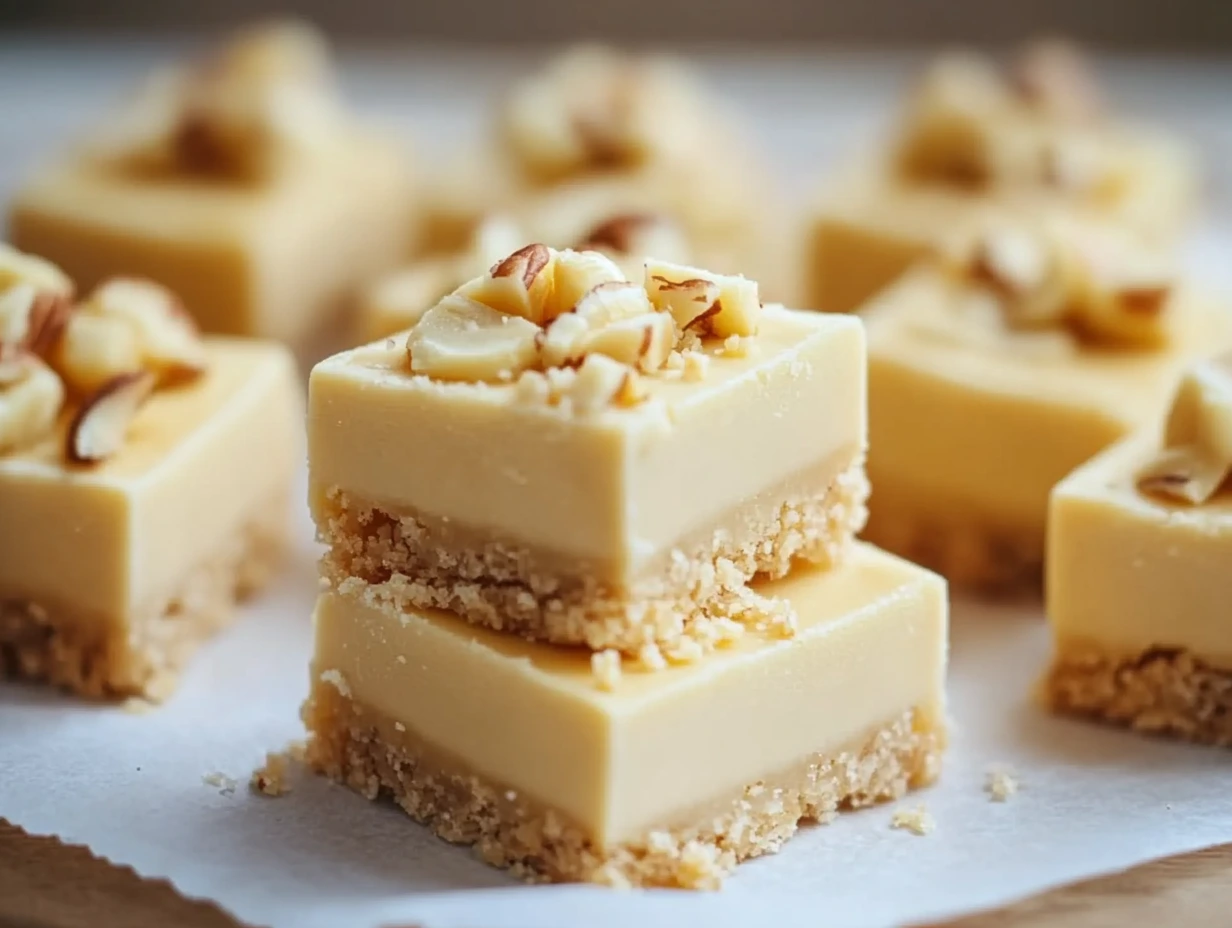
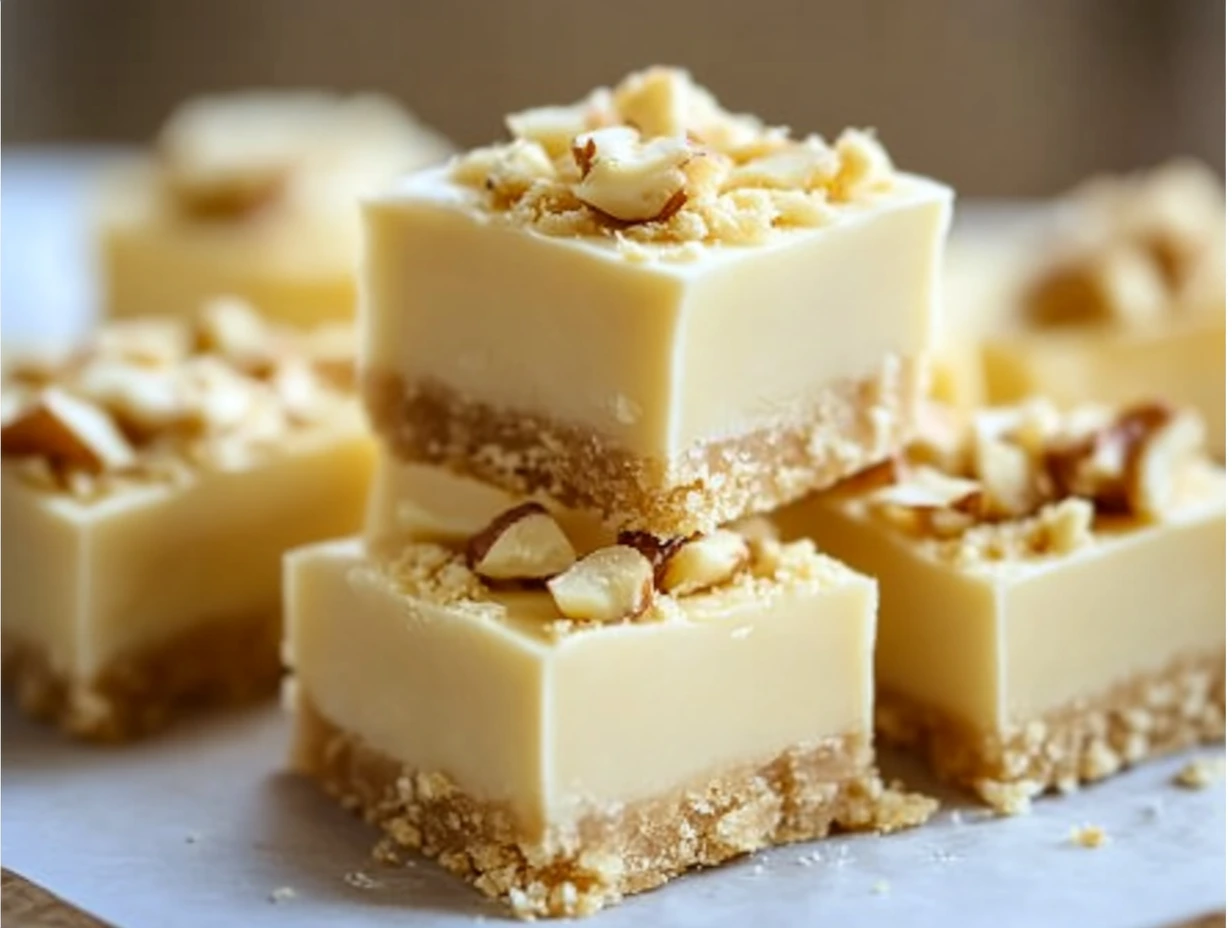
If you’ve ever found yourself staring at an overripe banana and thinking, “There has to be something more exciting than banana bread,” well, friend, you’re in for a treat—literally. This Banana Fudge recipe is creamy, sweet, and bursting with banana flavor, all swirled into a silky white chocolate base. It’s one of those easy, no-bake recipes that feels like a little magic trick: a few ingredients, a little chill time, and suddenly you’ve got a dessert that tastes like it came straight from a gourmet candy shop.
I first stumbled upon this idea when I had just one sad banana left on the counter—not quite enough for muffins, too ripe to slice over cereal, but way too perfect to toss. After a little pantry dive and some trial and error, this dreamy banana fudge came to life. Let me tell you: it’s become a go-to for everything from casual weekend cravings to sweet holiday gifts for friends.
WHY YOU’LL LOVE THIS BANANA FUDGE
Let’s be real—classic chocolate fudge is delicious, but sometimes you want to mix it up. This version still brings the richness you expect from fudge, but the banana and white chocolate combo adds a light, almost tropical vibe. It’s smooth, sweet, and melts in your mouth, with just the right amount of banana flavor to make it special without being overpowering.
Plus, it’s no-bake, which is a big win for anyone (like me) who’s not turning on the oven in the middle of summer—or honestly, any time the mood for a low-effort dessert strikes. And if you’re into gifting homemade treats, this one slices beautifully and looks as good as it tastes.
Alright, let’s get into the good stuff: how to make it.
INGREDIENTS YOU’LL NEED
-
1 ripe banana, mashed
-
2 cups white chocolate chips (you can totally swap in milk or dark chocolate if that’s more your style)
-
½ cup sweetened condensed milk
-
¼ cup unsalted butter
-
¼ tsp salt
-
½ tsp vanilla extract
-
¼ cup chopped nuts (optional – but I love the crunch they add)
STEP 1: PREP YOUR PAN
Start by lining an 8×8-inch square baking pan with either parchment paper or foil. Leave a little overhang on the sides—this will make it super easy to lift the fudge out once it’s set. Trust me, it’s a small step that makes a big difference when it comes time to slice and serve.
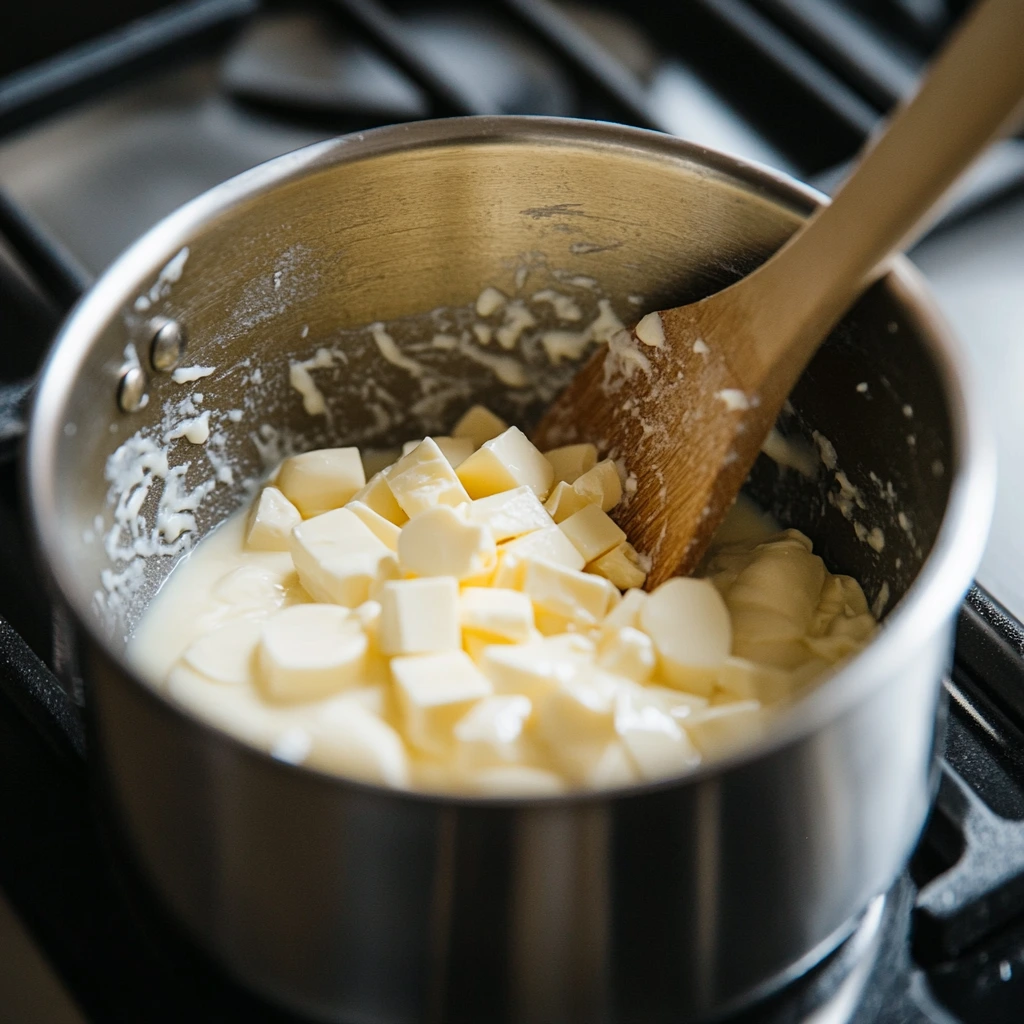
STEP 2: MELT THE CHOCOLATE
Grab a medium saucepan and set it over low to medium heat. Add your white chocolate chips, sweetened condensed milk, and butter. This is where you want to be patient—keep stirring constantly to prevent anything from burning or sticking. The mixture should turn smooth, glossy, and totally lump-free. If you’re using a different kind of chocolate, just keep an eye on the texture; dark and milk chocolate can behave a little differently, but they’ll still melt beautifully with the other ingredients.
STEP 3: MIX IN THE FLAVOR
Once the mixture is fully melted and smooth, remove it from the heat. Stir in your mashed banana, salt, and vanilla extract. It might look like the banana is going to clump, but just keep stirring and it’ll blend right in. This is where all the flavor starts to come together—the sweetness of the white chocolate, the richness of the condensed milk, and that subtle banana magic.
If you’re adding nuts, now’s the time to fold them in. Walnuts or pecans are great choices, but really, go with whatever you’ve got on hand. Even crushed pretzels could be fun for a salty twist.
STEP 4: TRANSFER & SMOOTH IT OUT
Pour the fudge mixture into your prepared 8×8-inch pan. If it looks a little thick or uneven, don’t worry—we’re going to fix that.
Use a spatula to spread it out into an even layer. Make sure it reaches the edges and that the surface is as smooth as you can get it. I like to give the pan a gentle tap on the counter a couple of times to pop any air bubbles. This also helps the fudge settle into a nice, level layer for prettier slices later on.
At this point, you’re going to be tempted to sneak a taste—but hold off. It’s going to be so much better once it’s chilled and set!
STEP 5: CHILL UNTIL FIRM
Now it’s time to let your fridge do the rest of the work. Place the pan in the refrigerator and let the fudge chill for at least 2 hours. If you can let it sit longer (even overnight), that’s even better. The longer it chills, the easier it will be to cut into clean, firm squares.
Pro tip: if you’re making this for a party or gift baskets, go ahead and make it the night before. It stores beautifully and actually tastes even better the next day as the flavors settle.
STEP 6: SLICE & SERVE
Once the fudge is set, use the parchment or foil overhang to lift it out of the pan. Place it on a cutting board and use a sharp knife to slice it into squares. Wipe the knife clean between cuts for neat edges (especially if you’re gifting or sharing—it makes a big difference in presentation).
Store your banana fudge in an airtight container in the fridge. It’ll keep well for about 5 to 7 days, but chances are, it won’t last that long!
TIPS FOR BANANA FUDGE SUCCESS
There are a few small tips that can take your fudge from good to amazing, especially if you’re making it for the first time. Here are my tried-and-true tricks:
-
Use a ripe (but not too overripe) banana: You want it sweet and soft, but not mushy or fermented. The banana flavor should be mellow and clean, not overwhelming.
-
Don’t skip the salt: That tiny bit of salt really balances out the sweetness. It’s subtle but so important.
-
Low and slow is the way to go: When melting the chocolate and butter, keep the heat on low-medium. Rushing this step can lead to grainy texture or scorched chocolate.
-
Add texture if you like: Nuts add a lovely crunch, but you can also play with crushed cookies, dried banana chips, or even a swirl of peanut butter for something totally unique.
FUN VARIATIONS TO TRY NEXT TIME
Once you’ve made the classic version, it’s hard not to start brainstorming all the ways you can switch it up. Here are a few delicious variations you might want to try:
-
Peanut Butter Banana Fudge: Add a couple tablespoons of peanut butter to the mix while melting the chocolate. It brings that Elvis Presley combo vibe.
-
Dark Chocolate Banana Fudge: Swap white chocolate chips for dark chocolate for a richer, slightly more grown-up flavor.
-
Tropical Twist: Add shredded coconut or chopped dried pineapple along with the banana. It’s like fudge meets piña colada.
-
Nut-Free Option: Skip the nuts entirely and use crispy rice cereal or sunflower seeds for crunch without allergens.
FREQUENTLY ASKED QUESTIONS
1. Can I freeze banana fudge?
Yes, absolutely! Banana fudge freezes well. Just be sure to wrap it tightly in plastic wrap or foil and place it in an airtight container. It’ll keep for up to 2 months. To enjoy, let it thaw in the fridge overnight before serving.
2. Can I use frozen bananas instead of fresh?
Technically, yes—but with caution. Frozen bananas tend to release more liquid when thawed, which can slightly change the texture of the fudge. If you use a thawed banana, be sure to drain off any excess liquid before mixing it in.
3. What if I only have milk or dark chocolate?
Go for it! Milk and dark chocolate both work well in this recipe. Just know that using darker chocolate will mute the banana flavor a bit and create a richer, more traditional chocolate fudge profile.
4. How long does banana fudge last in the fridge?
Stored in an airtight container, banana fudge will stay fresh in the fridge for about 5 to 7 days. Make sure to keep it chilled for the best texture and flavor.
5. Can I make this dairy-free?
You can try! Use dairy-free white chocolate (yes, it exists!) and swap out the butter for a plant-based alternative. For the sweetened condensed milk, there are coconut-based versions that work well in no-bake desserts. Keep in mind, this may slightly alter the flavor and texture.
6. Why is my fudge too soft or sticky?
This can happen if the mixture didn’t cook long enough, or if too much banana was added. Make sure to follow the measurements closely and give the fudge plenty of time to chill. If you’re in a humid climate, storing it in the freezer might give it a firmer bite.
7. Can I double the recipe?
Definitely! Just use a 9×13-inch pan instead of an 8×8 and double all the ingredients. It’s perfect for parties, potlucks, or holiday trays.
CONCLUSION: SWEET, SIMPLE & SURPRISINGLY ADDICTIVE
There’s something so comforting about the flavor of banana—maybe it’s the childhood nostalgia, maybe it’s just that natural sweetness—but pair it with silky white chocolate and a hint of vanilla, and you’ve got yourself a no-bake treat that feels a little extra special.
This Banana Fudge recipe is one of those rare desserts that’s easy enough for beginners, but still feels impressive enough to share. Whether you’re whipping up a quick weeknight sweet, making something fun with the kids, or packaging up squares for holiday gifting, it’s a guaranteed crowd-pleaser.
And here’s the best part: once you’ve got the base recipe down, the variations are endless. From nutty to chocolatey, fruity to crunchy—you can customize it to fit your flavor mood.
So, if you try it, I’d love to hear how it went! Did you add a twist? Serve it at a party? Hide the last few pieces in the back of the fridge (no judgment here)? Let me know in the comments, and don’t forget to share this recipe with someone who needs a little sweet inspiration.
Happy fudge-making!
Print
BANANA FUDGE
- Total Time: 2 hours 10 minutes
Description
Creamy, rich, and with a sweet banana twist, this Banana Fudge is the perfect no-bake treat. It blends the mellow flavor of ripe banana with silky white chocolate, creating a dessert that’s both nostalgic and indulgent. Great for parties, gifting, or a sweet bite just for you!
Ingredients
- 1 ripe banana, mashed
- 2 cups white chocolate chips (or substitute milk/dark chocolate for a richer flavor)
- ½ cup sweetened condensed milk
- ¼ cup unsalted butter
- ¼ tsp salt
- ½ tsp vanilla extract
- ¼ cup chopped nuts (optional, for texture)
Instructions
1️⃣ Prepare your pan:
Line an 8×8-inch square baking pan with parchment paper or foil, leaving a bit of overhang on the sides for easy removal later.
2️⃣ Melt the chocolate:
In a medium saucepan over low-medium heat, combine the white chocolate chips, sweetened condensed milk, and butter. Stir constantly until everything is melted and smooth.
3️⃣ Mix in banana and flavorings:
Remove the saucepan from the heat. Stir in the mashed banana, salt, and vanilla extract. Mix until fully incorporated. If using nuts, fold them in now.
4️⃣ Transfer and smooth:
Pour the mixture into the prepared pan. Use a spatula to spread it out evenly and smooth the top. Gently tap the pan on the counter to eliminate air bubbles.
5️⃣ Chill to set:
Refrigerate for at least 2 hours, or until the fudge is firm and set.
6️⃣ Slice and enjoy:
Lift the fudge out of the pan using the parchment/foil overhang. Cut into squares and serve. Store any leftovers in an airtight container in the fridge.
Notes
- Make sure your banana is very ripe for the best flavor and smoothest texture.
- Want a twist? Try adding a pinch of cinnamon or swapping the white chocolate for a combo of dark and milk chocolate.
- These make great edible gifts—wrap them in wax paper squares or decorative boxes!
- Prep Time: 10 minutes
- Cook Time: 2 hours
Nutrition
- Serving Size: 16 squares
