

If there’s one thing I’ve learned over the years, it’s that peanut butter and chocolate are a match made in dessert heaven. And when you take that perfect duo and turn it into a giant, sliceable version of a Reese’s peanut butter cup? Well, you’ve basically unlocked the dessert of every sweet tooth’s dreams.
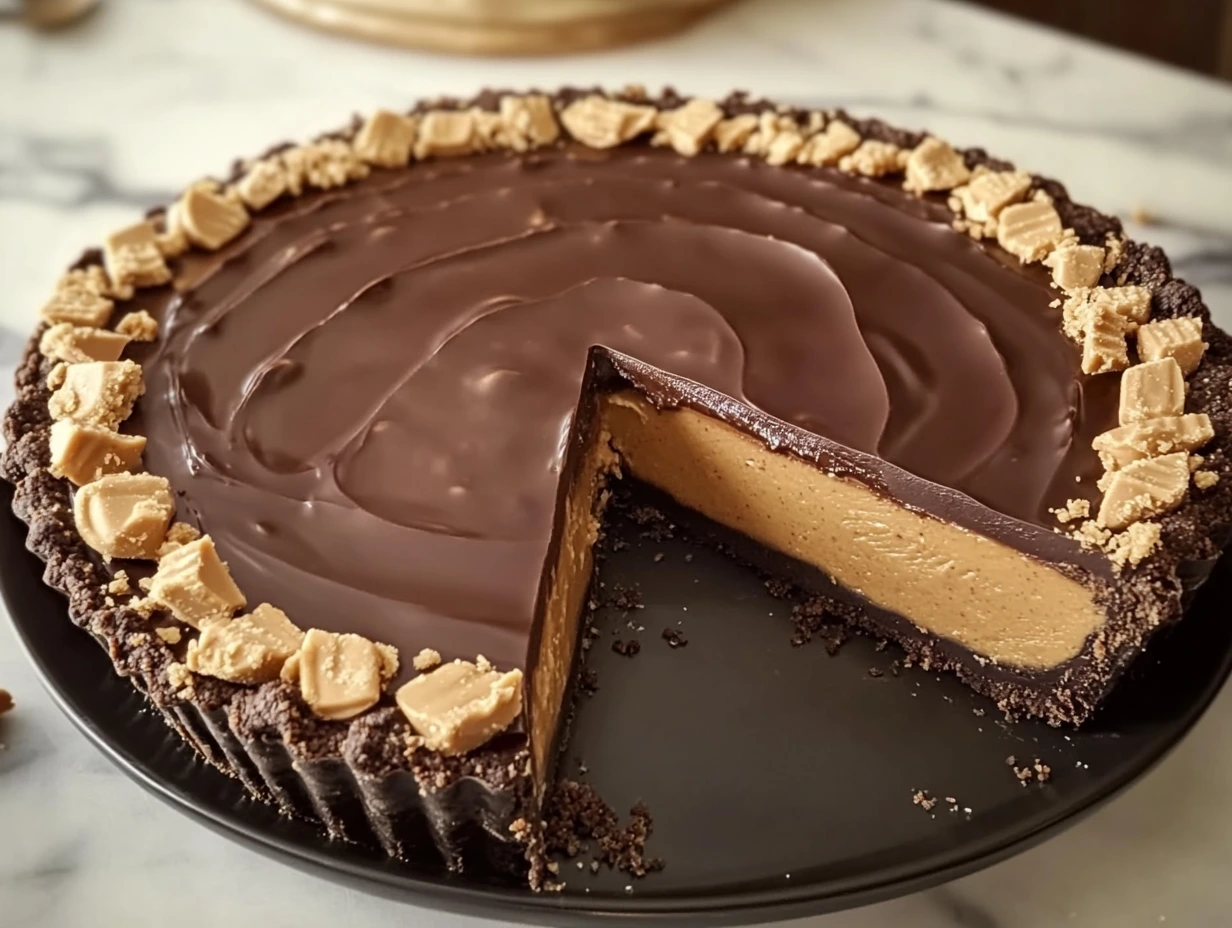
This Giant Reese’s Peanut Butter Cup Pie is rich, creamy, and completely indulgent in the best way. Imagine biting into a thick layer of peanut butter filling, nestled in a crunchy chocolate cookie crust, all topped off with silky chocolate ganache. It’s as if your favorite candy bar went to a fancy dinner party and came back in pie form.
I first made this for a game day get-together, and let’s just say the pie didn’t make it past halftime. It’s the kind of dessert that makes people pause mid-bite, close their eyes, and say “oh my gosh” with their mouths full. If you’re planning for a party, holiday gathering, or just a night when you want something sweet and impressive without turning on the oven, this recipe is going to be your go-to.
And the best part? It’s no-bake. Yup, no oven time required—just a few simple ingredients, some mixing and chilling, and a whole lot of deliciousness.
Let’s get started with the first steps: the crust and the peanut butter filling.
STEP 1: MAKE THE CHOCOLATE COOKIE CRUST
Before we dive into the dreamy peanut butter layer, we’ve got to start with a sturdy, chocolatey base. This crust is made from crushed chocolate cookies—Oreo-style cookies work best here (and yes, you can leave the cream filling in!).
Here’s what you’ll need:
-
1 ½ cups chocolate cookie crumbs (about 20 Oreos, crushed)
-
6 tablespoons unsalted butter, melted
Start by pulsing the cookies in a food processor until they become fine crumbs. If you don’t have a food processor, a zip-top bag and a rolling pin work just as well. Once your crumbs are ready, combine them in a bowl with the melted butter and mix until everything is well combined. The texture should look a bit like wet sand—moist enough to hold together but not soggy.
Now grab your 9-inch pie dish and press the crumb mixture evenly into the bottom and up the sides. Use the bottom of a flat measuring cup or glass to really press it down and smooth everything out. You want a nice, compact crust that won’t fall apart when you slice into it later.
Once your crust is set, pop it into the refrigerator to chill while you work on the filling. This helps firm it up and ensures a solid base for that creamy peanut butter layer.
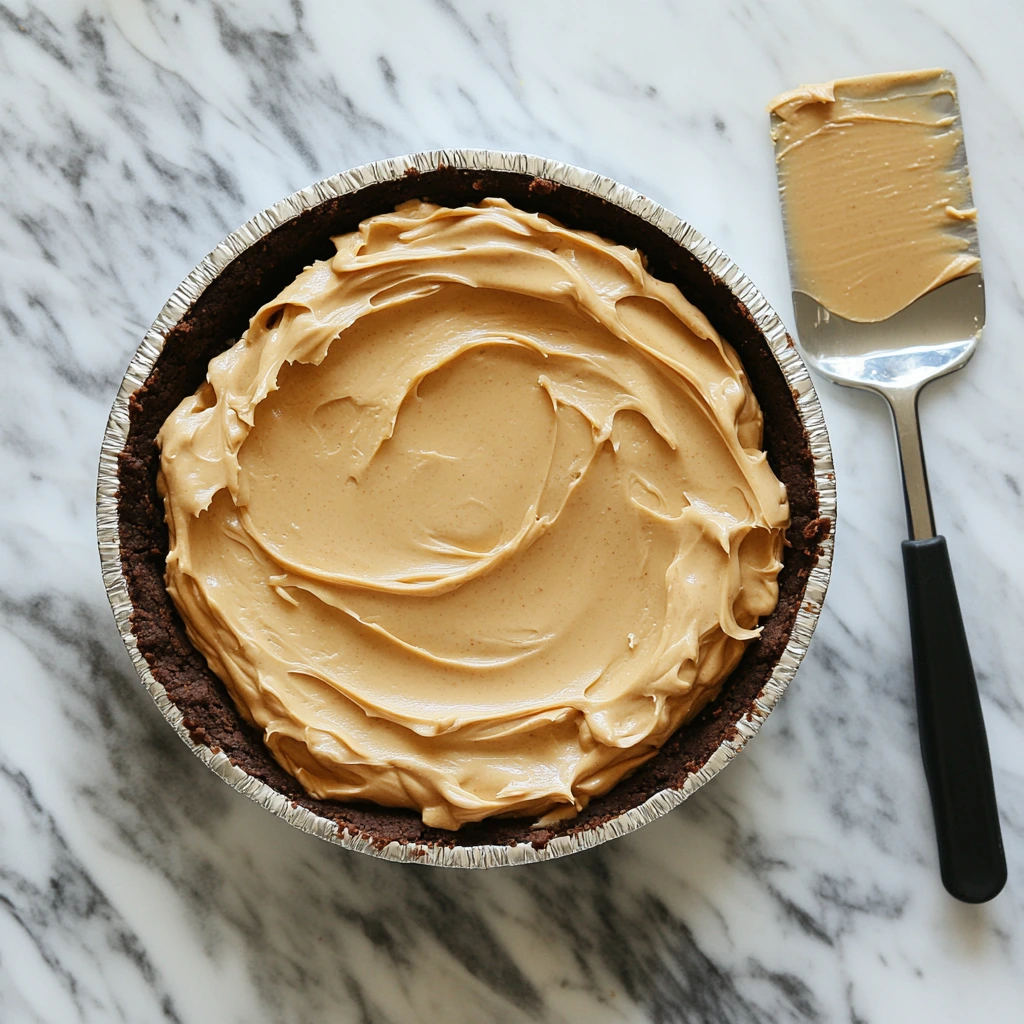
STEP 2: MAKE THE PEANUT BUTTER FILLING
This is the heart of the pie—the creamy, sweet, peanut buttery center that makes this dessert so irresistible. It’s smooth, rich, and perfectly sweet without being too heavy.
You’ll need:
-
1 cup creamy peanut butter
-
½ cup unsalted butter, softened
-
1 cup powdered sugar
-
1 teaspoon vanilla extract
In a large mixing bowl, beat together the peanut butter and softened butter until they’re well blended and fluffy. A hand mixer works great for this, but you can absolutely do it with a sturdy whisk and some elbow grease.
Next, add the powdered sugar and vanilla extract. Continue mixing until everything is creamy and smooth. The filling should be thick but spreadable—kind of like the inside of a peanut butter cup, only better.
Take the chilled crust out of the fridge and spoon the peanut butter filling into it. Use a spatula to spread the filling evenly and smooth the top. Then pop the whole pie back into the fridge for about 30 minutes. This helps firm up the peanut butter layer before we add the ganache, so everything stays beautifully layered.
STEP 3: MAKE THE CHOCOLATE GANACHE
Ganache sounds fancy, but it’s really just two ingredients: chocolate and heavy cream. The key here is to use good-quality chocolate chips and to heat your cream just enough—not boiling, just steamy and starting to bubble around the edges.
You’ll need:
-
1 cup semi-sweet chocolate chips
-
½ cup heavy cream
Start by placing the chocolate chips in a heatproof bowl. Set that aside while you heat the cream.
In a small saucepan, warm the heavy cream over medium heat. You’re not looking for a full boil—just a gentle simmer. Once you see those tiny bubbles forming around the edges and steam rising from the surface, it’s ready.
Immediately pour the hot cream over the chocolate chips and let it sit for 2–3 minutes. Don’t stir right away! This resting time allows the chocolate to soften and melt gently, which helps create a smoother ganache.
After a few minutes, grab a spoon or whisk and slowly stir from the center outward. The mixture will turn glossy and velvety as the chocolate fully melts into the cream. If there are any stubborn lumps, keep stirring—they’ll melt with a bit of patience. Let the ganache cool slightly for about 5 minutes before pouring it onto your pie.
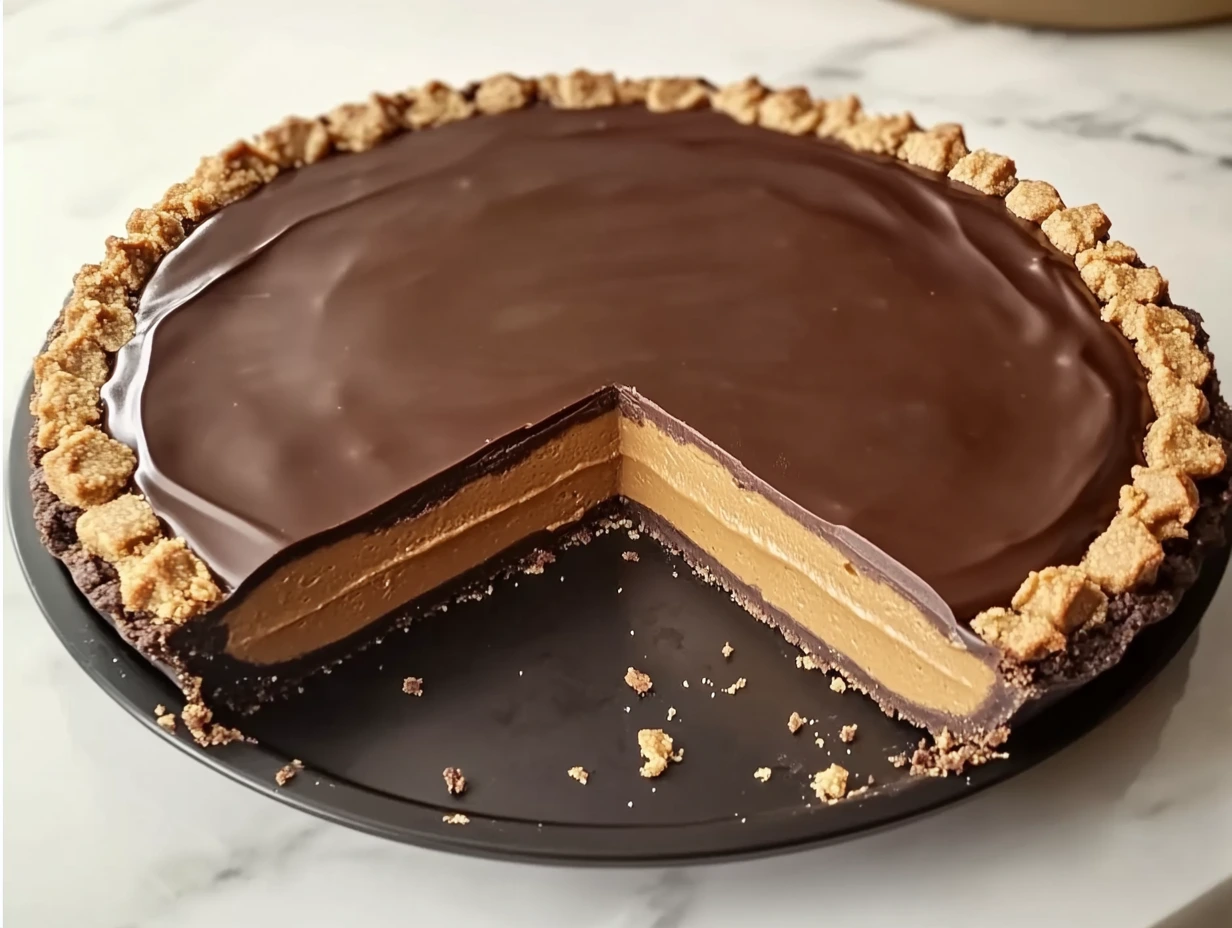
STEP 4: ASSEMBLE THE PIE
Now comes the satisfying part—putting it all together. Take the pie out of the refrigerator, and gently pour the slightly cooled ganache over the peanut butter filling. Use a spatula or the back of a spoon to spread the ganache evenly to the edges, letting it create a glossy, smooth layer on top.
It’s already stunning, but we’re not quite done yet. For an extra pop of texture and peanut butter flavor, top the ganache with 4–6 chopped mini Reese’s Peanut Butter Cups. You can sprinkle them all over the top or create a ring around the outer edge—it’s totally up to you. There’s no wrong way to decorate a pie that looks this good.
Once assembled, pop the pie back in the fridge and let it chill for at least 2 hours. This final chill helps everything set properly so you get those clean, defined layers when you slice into it. You can even make it a day ahead and let it chill overnight—just cover it loosely with plastic wrap once the ganache is firm.
OPTIONAL TOPPINGS & SERVING SUGGESTIONS
Once your pie is set and ready to serve, you can absolutely stop here and dig in. But if you’re in the mood to go the extra mile (and let’s be honest, we usually are), here are a few fun ways to dress it up even more:
-
Whipped cream: A dollop or piped swirl adds lightness to every bite.
-
Chopped peanuts: A sprinkle adds crunch and contrast.
-
Colorful sprinkles: Fun for birthdays or special occasions.
To serve, run a sharp knife under hot water and dry it before slicing. This helps cut through the ganache and peanut butter layer cleanly without dragging.
Each slice is rich, so small portions go a long way—but good luck stopping at one! It’s indulgent in all the right ways: salty-sweet, creamy, chocolatey, and a little crunchy from that cookie crust. Honestly, it’s hard to believe how easy it is when you see how impressive it looks.
FREQUENTLY ASKED QUESTIONS
1. Can I use natural peanut butter instead of regular creamy peanut butter?
It’s best to stick with regular, shelf-stable creamy peanut butter (like Jif or Skippy) for this recipe. Natural peanut butter tends to separate and can be too oily or runny, which makes the filling less stable and harder to set.
2. Can I make this pie ahead of time?
Absolutely! This pie is a perfect make-ahead dessert. You can prep it up to 24 hours in advance and store it in the fridge. Just make sure it’s loosely covered with plastic wrap or foil once the ganache has set.
3. What kind of chocolate chips work best for the ganache?
Semi-sweet chocolate chips are ideal for a balanced sweetness, but if you prefer something richer, feel free to use dark chocolate chips. Milk chocolate works too, but the ganache will be sweeter and softer.
4. Can I freeze this pie?
Yes! You can freeze the finished pie for up to one month. Wrap it tightly in plastic wrap and then foil to prevent freezer burn. When you’re ready to enjoy it, thaw in the refrigerator overnight.
5. What if I don’t have a food processor to crush the cookies?
No problem—just place the cookies in a zip-top bag and crush them with a rolling pin or a heavy skillet. It takes a little muscle, but it works perfectly.
6. Is this recipe gluten-free?
As written, no—most chocolate sandwich cookies contain gluten. However, you can easily make it gluten-free by using gluten-free chocolate cookies for the crust. Just double-check the labels on all other ingredients to be safe.
7. Can I use a different nut butter, like almond or cashew?
You can, but keep in mind it will change the flavor. Make sure the nut butter you choose is creamy and not overly oily or separated. The consistency should be similar to classic peanut butter.
FINAL THOUGHTS: WHY THIS PIE BELONGS IN YOUR RECIPE BOX
This Giant Reese’s Peanut Butter Cup Pie is one of those desserts that makes people’s eyes light up when you bring it to the table. It’s playful, nostalgic, and totally over-the-top—in the best possible way. But what I love most is how simple it is. No baking. No fancy techniques. Just a few pantry staples and a little patience while it chills in the fridge.
It’s a great pick for birthdays, potlucks, holiday dinners, or honestly any day you want to treat yourself or someone else. The layers look beautiful when sliced, and the flavor delivers every time—creamy, chocolatey, and just the right amount of sweet.
I’d love to hear how it turns out for you! If you try this recipe, be sure to drop a comment and let me know what you think. Did you add extra toppings? Try a fun twist? I always enjoy seeing how others make it their own.
Now go grab that pie dish—it’s time to turn your candy cravings into a show-stopping dessert.
Print
GIANT REESE’S PEANUT BUTTER CUP PIE
- Total Time: 2 hours 50 minutes
Description
This rich, indulgent dessert is like a giant version of your favorite candy! A crunchy chocolate cookie crust is filled with a luscious peanut butter filling and topped with a smooth chocolate ganache. It’s perfect for parties, holidays, or anytime you’re craving a seriously decadent treat.
Ingredients
For the crust:
- 1 ½ cups chocolate cookie crumbs (about 20 Oreos, crushed)
- 6 tbsp unsalted butter, melted
For the peanut butter filling:
- 1 cup creamy peanut butter
- ½ cup unsalted butter, softened
- 1 cup powdered sugar
- 1 tsp vanilla extract
For the chocolate ganache topping:
- 1 cup semi-sweet chocolate chips
- ½ cup heavy cream
For garnish:
- 4–6 mini Reese’s Peanut Butter Cups, chopped
- Optional: whipped cream, chopped peanuts, or sprinkles
Instructions
1️⃣ Make the crust:
In a mixing bowl, combine chocolate cookie crumbs and melted butter. Mix until the texture resembles wet sand.
Press the mixture firmly into the bottom and up the sides of a 9-inch pie dish. Use the back of a spoon or a flat-bottomed glass to pack and smooth it.
Place in the refrigerator to chill while you make the filling.
2️⃣ Prepare the peanut butter filling:
In a large bowl, beat the peanut butter, softened butter, powdered sugar, and vanilla extract until creamy and smooth.
Spread evenly into the chilled crust and smooth the top with a spatula.
Refrigerate the pie for 30 minutes to set the filling.
3️⃣ Make the chocolate ganache:
Place the chocolate chips in a heatproof bowl.
In a saucepan, heat the heavy cream over medium heat until it just begins to simmer (don’t boil).
Pour the hot cream over the chocolate chips and let sit for 2–3 minutes.
Stir until smooth and glossy. Let the ganache cool slightly (about 5 minutes).
4️⃣ Assemble the pie:
Pour the ganache over the peanut butter layer and spread it evenly.
Top with chopped mini Reese’s.
Chill the pie in the refrigerator for at least 2 hours, or until fully set.
5️⃣ Serve:
Slice and serve chilled or at room temperature.
Top with whipped cream, chopped peanuts, or sprinkles if desired.
Notes
- Cookie Crumbs: You can use any chocolate sandwich cookies (like Oreos) for the crust. Don’t worry about removing the cream filling—it actually helps the crust bind better.
- Peanut Butter: For the best texture, use regular creamy peanut butter like Jif or Skippy. Natural peanut butters (the kind that separate) may cause the filling to be oily or runny.
- Ganache Tips: Let the ganache cool for a few minutes before pouring it onto the pie to avoid melting the peanut butter layer.
- Prep Time: 20 minutes
- Cook Time: 2 hours 30 minutes
Nutrition
- Serving Size: 8–10 slices
