


There’s something about the first hint of spring that makes me crave bright, zesty flavors—and these Lemon Cream Cheese Bars deliver just that. I still remember the first time I whipped up this recipe: I was hosting a little backyard brunch, and between the tulips bursting into bloom and the breeze carrying the scent of fresh-cut grass, these bars stole the show. They’re the perfect balance of buttery shortbread and silky, lemon-kissed cream cheese—everything you want in a springtime dessert, without feeling too heavy.
If you’ve ever enjoyed classic cheesecake bars but wished for a lighter, more refreshing twist, you’re in the right place. The foundation here is a simple, buttery shortbread crust that bakes up golden and crisp. Topped with a luscious, tangy cream cheese filling that’s been brightened with fresh lemon juice and zest, these bars are guaranteed to make you look like a kitchen rockstar—no fancy equipment required.
Before we dive into the fun part, let’s talk ingredients and prep. You’ll need two blocks of full-fat cream cheese, a hefty dose of fresh lemon juice (about three to four lemons’ worth), and, of course, plenty of butter and sugar for that rich, satisfying crust. If you’d like to up the creaminess factor even more, folding in a bit of sour cream or Greek yogurt does wonders.
Now, let’s get started!
1. Preheat & Prep
First things first: preheat your oven to 350 °F (175 °C). While your oven is heating up, line an 8×8-inch (20×20 cm) baking pan with parchment paper. I always leave a couple of inches of overhang on two opposite sides—trust me, it makes lifting the entire block out of the pan a total breeze when it’s time to slice.
2. Make the Shortbread Crust
In a medium mixing bowl, combine:
-
1 cup (226 g) softened unsalted butter
-
¼ cup (50 g) granulated sugar
-
2 cups (250 g) all-purpose flour
-
¼ tsp salt
Grab a pastry cutter (or roll up your sleeves and use your fingertips) and work the butter into the dry ingredients. You’re aiming for coarse crumbs that hold together when pressed. As you mix, you’ll notice the dough start to clump—that’s exactly what you want.
Once your dough is ready, transfer it into the prepared pan. Press it down firmly and evenly, making sure the corners and edges are well-packed. A small piece of parchment or the bottom of a measuring cup works perfectly to smooth everything out.
3. Bake the Crust
Pop the pan into your preheated oven and bake for 15–18 minutes, or until the edges turn a light golden hue. While the crust is baking, take a moment to admire that buttery aroma filling your kitchen—you deserve a little pause here. When the timer dings, remove the crust and let it cool just enough so it’s warm to the touch but not piping hot. This gentle cooldown helps prevent the cream cheese layer from melting too quickly when poured on top.
4. Prepare the Lemon Cream Cheese Filling
-
Beat the Cream Cheese and Sugar
-
In a large mixing bowl (or the bowl of your stand mixer fitted with the paddle attachment), add 2 (8 oz/226 g each) packages of softened full-fat cream cheese and 1 cup (200 g) granulated sugar.
-
Beat on medium speed until the mixture is completely smooth and silky—about 2 minutes. Scrape down the sides of the bowl once or twice to ensure there are no hidden lumps.
-
-
Incorporate the Eggs
-
Crack in 3 large eggs, one at a time, mixing well after each addition. This gradual approach keeps the texture velvety. Overbeating can introduce air bubbles, which sometimes leads to fissures on the surface, so keep it gentle.
-
-
Add the Lemon Zing
-
Pour in ½ cup (120 ml) fresh lemon juice—about 3 to 4 medium lemons, depending on size and juiciness. Tip: Roll your lemons on the countertop with a bit of pressure before juicing; it helps release more juice!
-
Sprinkle in the zest of 2 lemons (use a microplane for the finest texture) to pack in that bright citrus flavor.
-
Stir in 1 teaspoon pure vanilla extract for a subtle, warming counterpoint to the tart lemon.
-
-
Optional Creaminess Boost
-
If you’re craving extra richness, fold in ¼ cup (60 g) sour cream or Greek yogurt. It adds a lovely silkiness and helps the filling set just a touch more tenderly. Just don’t overmix at this stage—fold until you see no streaks.
-

5. Assemble & Bake
-
Pour and Spread: Gently pour the lemon cream cheese mixture over your warm shortbread crust. Use an offset spatula or the back of a spoon to coax it into an even layer, right up to the edges.
-
Bake to Perfection: Slide the pan back into your 350 °F (175 °C) oven and bake for 20–25 minutes. You’re looking for a center that’s set around the edges but still gives a tiny, reassuring jiggle when you gently shake the pan—think brownie, not raw custard.
Pro Tip: If you’re nervous about smooth tops, bake with a water bath trick: place your 8×8-inch pan inside a slightly larger roasting pan, then pour hot water around it (not into the bars). The extra moisture helps the filling bake more evenly and minimizes surface cracks.
6. Cool & Chill
-
Room-Temperature Cooldown: Once baked, remove the pan and let it sit undisturbed on a wire rack for about 30–45 minutes. This gradual cooldown helps prevent sudden temperature shifts that can cause cracking.
-
Refrigerate for Firmness: After it’s lukewarm, cover loosely with plastic wrap or foil and pop it into the fridge for at least 2 hours—or, if you have the patience, overnight. This extended chill does two great things: it lets the flavors meld and guarantees the bars slice cleanly, with no oozing edges.
Helpful Variations & Tips
-
Sugar Swap: For a lightly floral twist, replace half the granulated sugar in the filling with superfine (caster) sugar. It dissolves almost instantly, creating an ultra-silky texture.
-
Herbal Infusion: During the crust bake, tuck a sprig of fresh thyme or basil on a corner of the pan (remove before adding the filling). It leaves behind the subtlest, herbaceous whisper that pairs surprisingly well with lemon.
-
Gluten-Free Option: Swap the 2 cups of all-purpose flour in the crust for a gluten-free 1:1 baking blend. You may need to press the crust a bit more firmly since gluten-free flours can be crumblier.
-
Serving Ideas: These bars shine on their own, but for extra indulgence, top a slice with a dollop of whipped cream and a few fresh berries just before serving.

Frequently Asked Questions
1. Can I make these bars ahead of time?
Absolutely! These bars actually taste even better the next day, once the flavors have melded. After baking and chilling, store them in an airtight container in the refrigerator for up to 4 days. For longer keeping, you can freeze individual bars (wrapped tightly) for up to one month—just thaw in the fridge before serving.
2. Why did my filling crack on top?
Sudden temperature changes and overbeating are usually the culprits. To prevent cracks, bake at a steady 350 °F (175 °C) and avoid high-speed mixing once you add the eggs. Let the bars cool gradually at room temperature before chilling in the fridge. If you try the water bath trick (placing the pan inside a larger pan of hot water), that extra moisture can also help maintain a smooth surface.
3. Can I use bottled lemon juice instead of fresh?
Technically, yes—but fresh juice is what gives these bars their bright, vibrant zing. Bottled juice often has preservatives that dull the flavor. If you must use bottled, look for one labeled “100% juice” and consider adding extra zest to bump up the citrus notes.
4. How do I get clean slices when cutting?
Chill the bars thoroughly—at least two hours, preferably overnight. Use a long, sharp knife and wipe the blade clean between each cut. For super-precise edges, run the knife under hot water, dry it, and then cut. The heat helps slice through the chilled filling without dragging.
5. Can I reduce the sugar in the recipe?
You can cut the filling sugar by up to 25% (use ¾ cup instead of 1 cup), but remember it balances the tartness of the lemons. Any more reduction may make the bars too sour and affect the texture. If you’re cutting sugar in the crust, swapping half the granulated sugar for a natural sweetener (like a 1:1 monk fruit blend) can work, but texture may shift slightly.
6. Is there a dairy-free version?
Replacing the cream cheese with a high-quality dairy-free alternative (such as cashew-based cream cheese) and using vegan butter in the crust can yield decent results. I’d still recommend adding the optional dairy-free yogurt for extra creaminess. Texture may be a bit softer, so serve slightly warmer than you would the traditional version.
7. What’s the best way to garnish?
A simple dusting of powdered sugar and a curl of lemon zest is classic and elegant. For a spring party, you could add a few edible flowers (like violets or nasturtiums) or top each bar with a small mint leaf. Just be gentle—the filling is delicate!
Conclusion
There you have it—bright, tangy, and irresistibly creamy Lemon Cream Cheese Bars that are as easy to make as they are delightful to eat. From the buttery shortbread base to that silky, citrus-infused filling, these bars strike the perfect balance between sweet and tart. Whether you’re hosting a spring brunch, need a pop of sunshine for afternoon tea, or simply want a refreshing treat any time of day, this recipe has your back.
Don’t forget: the true magic happens when you share these bars with friends and family. I’d love to hear how yours turn out—did you experiment with an herbal twist, go sugar-light, or try the dairy-free option? Drop a comment below with your favorite variations or any questions that pop up as you bake. And if you snap a pic, tag it #LemonCreamCheeseBars so I can see your kitchen creations!
Happy baking, and here’s to many more sunny-skies desserts in your future. Enjoy every zesty bite!
Print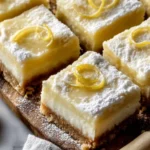
Lemon Cream Cheese Bars
- Total Time: 3 hours
Description
A bright and tangy twist on a classic cream cheese bar, these Lemon Cream Cheese Bars feature a buttery shortbread crust topped with a silky, lemon-infused cream cheese filling. Perfectly sweet with just the right amount of citrus zing, they’re ideal for spring gatherings, afternoon tea, or anytime you need a refreshing treat.
Ingredients
For the Shortbread Crust:
- 1 cup (226 g) unsalted butter, softened
- ¼ cup (50 g) granulated sugar
- 2 cups (250 g) all-purpose flour
- ¼ tsp salt
For the Lemon Filling:
- 2 (8 oz/226 g each) packages cream cheese, softened
- 1 cup (200 g) granulated sugar
- 3 large eggs
- ½ cup (120 ml) fresh lemon juice (about 3–4 lemons)
- Zest of 2 lemons
- 1 tsp pure vanilla extract
- Optional: ¼ cup (60 g) sour cream or Greek yogurt (for extra creaminess)
For Garnish:
- Powdered sugar, for dusting
- Lemon zest curls or thin slices (optional)
Instructions
1️⃣ Preheat & Prep
Preheat your oven to 350 °F (175 °C). Line an 8×8-inch (20×20 cm) baking pan with parchment paper, leaving an overhang on two sides for easy lifting.
2️⃣ Make the Shortbread Crust
In a medium bowl, combine the softened butter, sugar, flour, and salt. Use a pastry cutter or your fingertips to mix until the dough resembles coarse crumbs.
Press the mixture firmly and evenly into the bottom of the prepared pan.
3️⃣ Bake the Crust
Bake for 15–18 minutes, or until the edges are lightly golden. Remove from the oven and let cool slightly while you prepare the filling.
4️⃣ Prepare the Lemon Filling
In a large bowl, beat the cream cheese and sugar together until smooth and creamy.
Add the eggs one at a time, beating well after each addition.
Mix in the lemon juice, lemon zest, and vanilla extract. If using, fold in the sour cream or Greek yogurt until just combined.
5️⃣ Assemble & Bake
Pour the lemon filling over the warm crust, spreading it into an even layer.
Return to the oven and bake for 20–25 minutes, or until the center is set and no longer jiggles when gently shaken.
6️⃣ Cool & Chill
Let the bars cool completely on a wire rack. Then refrigerate for at least 2 hours (or overnight) to firm up and develop flavor.
7️⃣ Slice & Garnish
Lift the chilled slab out of the pan using the parchment overhang. Dust generously with powdered sugar and decorate with lemon zest curls or slices, if desired. Cut into 16 bars.
Notes
- Room-temperature ingredients help ensure a smooth, lump-free filling.
- Chilling is crucial for clean slices—try chilling overnight if you want the perfect bars.
- Make-ahead friendly: Bars keep refrigerated, covered, for up to 5 days (or freeze for up to 1 month).
- Prep Time: 20 minutes
- Cook Time: 2 hours, 40 minutes
Nutrition
- Serving Size: 16 bars
