

There’s something about a banana split that brings instant nostalgia—think childhood summers, ice cream parlors, and that unbeatable combination of bananas, chocolate, and creamy goodness. Now, imagine all that deliciousness transformed into an effortless, no-bake dessert! That’s exactly what this No-Bake Banana Split Cake delivers—a layered masterpiece of graham cracker crust, creamy filling, fresh fruit, and indulgent toppings. Best of all? No oven required!
Whether you’re preparing for a summer cookout, a family gathering, or just want to treat yourself to something sweet, this dessert is a guaranteed crowd-pleaser. Let’s dive into how to make this creamy, fruity delight.
Why You’ll Love This No-Bake Banana Split Cake
- Easy to make – No baking involved!
- Perfect for summer – Refreshing and fruity.
- Make-ahead friendly – Best served chilled, making it great for entertaining.
- Customizable – Swap in your favorite fruits or toppings for a unique twist.
Ingredients You’ll Need
This recipe keeps it simple with pantry staples and fresh fruit. Here’s what you’ll need:
For the Crust:
- 2 cups graham cracker crumbs
- 1/3 cup unsalted butter, melted
- 1 tsp salt
For the Filling:
- 16 oz cream cheese, softened
- 1/2 cup granulated sugar
- 8 oz whipped topping (Cool Whip)
- 1 tsp vanilla extract
For the Toppings:
- 3 to 4 bananas, sliced
- 20 oz can crushed pineapple, well-drained
- 20 oz strawberries, sliced
- 8 oz whipped topping (Cool Whip)
- 1/2 cup chopped hazelnuts
- Chocolate sauce
Step 1: Prepare the Graham Cracker Crust
The base of this cake is a buttery graham cracker crust that sets the stage for all the layers to come.
- In a medium-sized bowl, mix together the graham cracker crumbs, melted butter, and salt until well combined. The mixture should resemble wet sand.
- Press the crumb mixture firmly into the bottom of a greased 9×13-inch baking dish. Use the back of a spoon or the bottom of a glass to create an even layer.
- Place the dish in the refrigerator while you prepare the filling. This helps the crust firm up and hold its shape.
Pro Tip: If you prefer a crunchier crust, you can bake it at 350°F for 8–10 minutes and let it cool completely before adding the filling. However, keeping it no-bake makes this recipe even easier!
Step 2: Make the Creamy Filling
Now, let’s create the smooth, dreamy filling that will balance out the sweetness of the fruit.
- In a large bowl, beat the softened cream cheese, sugar, and vanilla extract until smooth and creamy. This step is crucial—make sure there are no lumps!
- Gently fold in the whipped topping (Cool Whip) using a spatula. Avoid overmixing; you want to keep the filling light and fluffy.
- Spread the filling evenly over the chilled graham cracker crust, making sure to cover the entire surface.
Pro Tip: If you want extra flavor, try adding a teaspoon of lemon juice to the filling. It gives a subtle tanginess that balances the sweetness perfectly.
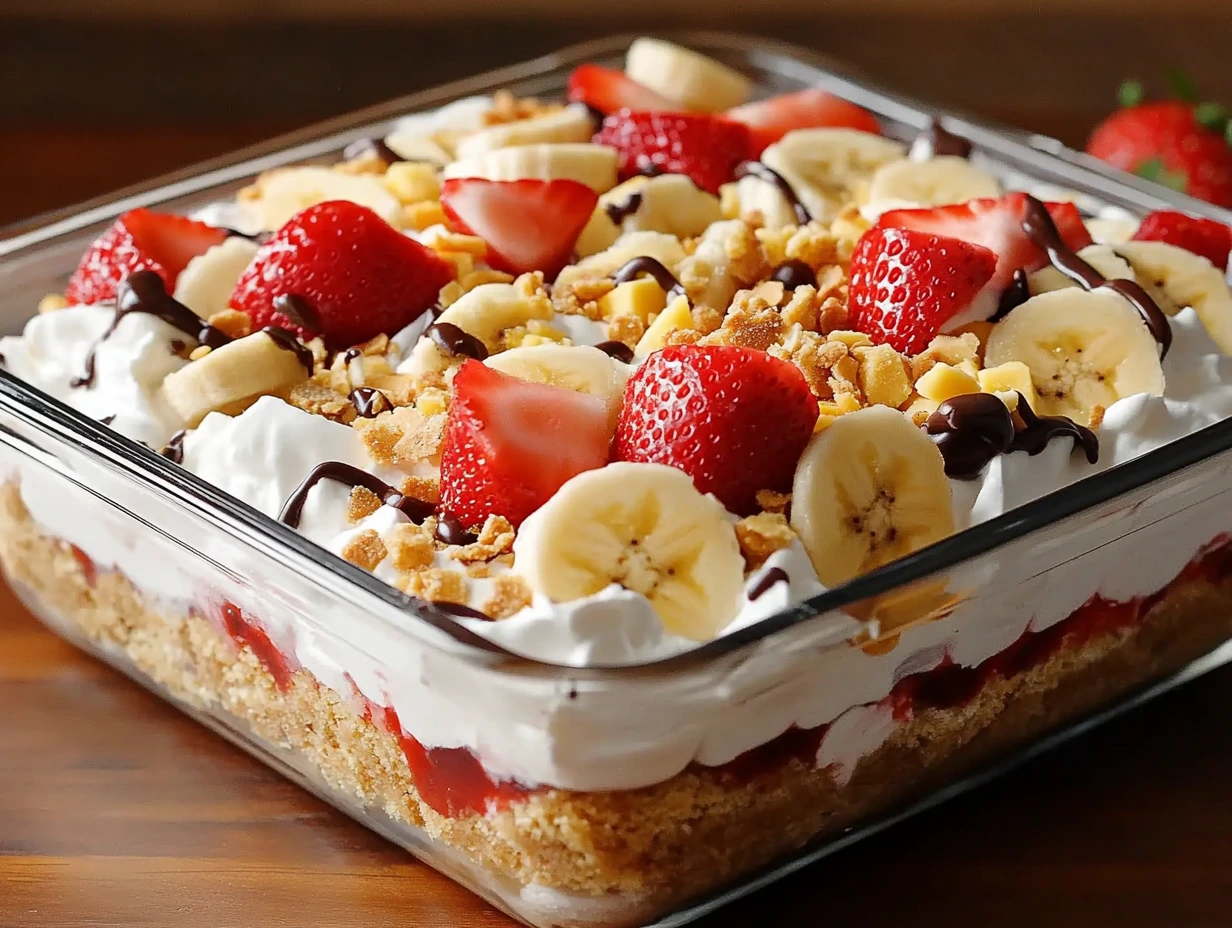
Step 3: Add the Fresh Fruit Layers
Now for the fun part—layering the fruit! This is where the dessert starts looking like a classic banana split.
- Slice the bananas and arrange them in an even layer over the cream cheese filling.
- Spread the well-drained crushed pineapple on top of the banana layer.
- Add the sliced strawberries in a beautiful, even layer.
Pro Tip: To keep the bananas from turning brown, toss them in a little lemon juice before layering them on the filling. This keeps them looking fresh and bright!
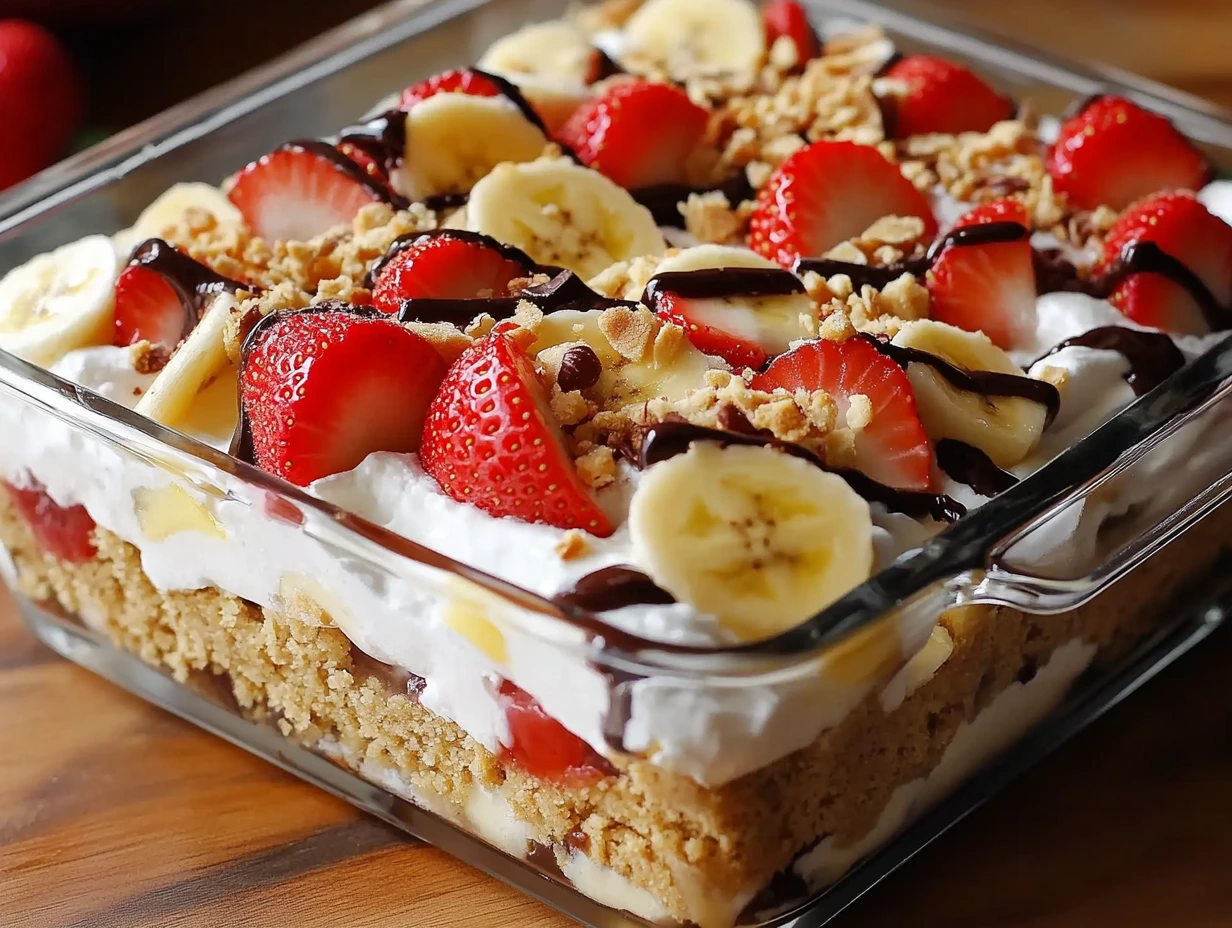
Step 4: Top It Off!
Once all your delicious fruit layers are in place, it’s time to add the finishing touches that take this dessert from great to absolutely irresistible.
- Spread another layer of whipped topping (Cool Whip) evenly over the strawberries. This gives the dessert a cloud-like finish and keeps everything held together.
- Drizzle generously with chocolate sauce. You can use store-bought chocolate syrup or make your own by melting chocolate chips with a little heavy cream.
- Sprinkle chopped hazelnuts over the top for that classic banana split crunch. If you’re not a fan of hazelnuts, you can use chopped peanuts, almonds, or even crushed graham crackers for extra texture.
- Cover the dish with plastic wrap and refrigerate for at least 4 hours or overnight. This allows the flavors to meld and the cake to firm up beautifully.
Pro Tip: Want a bit more indulgence? Add maraschino cherries on top for the full banana split effect! You can also sprinkle mini chocolate chips or even a handful of shredded coconut for extra fun.
Step 5: Chill and Serve
Once your No-Bake Banana Split Cake has had time to set, it’s time to slice and serve!
- Use a sharp knife to cut into squares.
- Serve chilled for the best texture and flavor.
- Add an extra drizzle of chocolate sauce or a dollop of whipped cream for an ultra-decadent presentation.
This dessert is light, creamy, fruity, and absolutely refreshing—the perfect no-bake treat for summer, birthdays, or anytime you want a sweet, easy dessert that wows!
Fun Variations to Try
Want to mix things up? Here are some creative twists to customize this recipe and make it your own!
Make It a Chocolate Lover’s Dream
- Swap out the graham cracker crust for a chocolate cookie crust using crushed Oreos or chocolate graham crackers.
- Add chocolate chips to the cream cheese filling for extra decadence.
- Use Nutella or hot fudge sauce instead of regular chocolate syrup.
Go Tropical!
- Replace strawberries with mango slices or kiwi for a tropical spin.
- Swap hazelnuts for toasted coconut flakes.
- Add a splash of coconut extract to the filling for a hint of island flavor.
Try a Healthier Version
- Use Greek yogurt instead of whipped topping for a protein-packed dessert.
- Swap the graham cracker crust for a crushed nut and date base for a naturally sweetened option.
- Reduce the sugar in the filling and let the natural fruit sweetness shine.
Make It Individual-Sized
- Instead of a large dish, layer everything into small jars or cups for perfect single-serve desserts.
- Great for parties, picnics, or meal prep!
Tips for the Best No-Bake Banana Split Cake
- Drain your pineapple well – Excess liquid can make your cake soggy!
- Refrigerate overnight – The longer it chills, the better it sets.
- Use ripe but firm bananas – Overripe bananas will turn mushy quickly.
- Keep leftovers covered in the fridge – It stays fresh for up to 3 days.
Frequently Asked Questions
1. How long does No-Bake Banana Split Cake last in the fridge?
This dessert stays fresh in the refrigerator for up to 3 days, but it’s best enjoyed within the first 24–48 hours for the freshest flavor and texture. Be sure to cover it tightly with plastic wrap to prevent the bananas from browning.
2. Can I make this dessert ahead of time?
Absolutely! This is one of those desserts that actually tastes better when made ahead because it allows the flavors to meld. For the best results, prepare it the night before and let it chill overnight.
3. What’s the best way to keep the bananas from turning brown?
Bananas can brown quickly once sliced, but you can prevent this by:
- Tossing them in lemon juice or pineapple juice before layering them.
- Ensuring they are completely covered with whipped topping so they don’t get exposed to air.
- Serving the dessert as soon as possible after slicing.
4. Can I use a different crust?
Yes! While graham cracker crust is the classic choice, you can swap it out for:
- Oreo crust for a chocolatey twist.
- Vanilla wafer crust for a sweeter base.
- Almond or pecan crust for a nutty, gluten-free option.
5. Can I make this dessert dairy-free?
Yes! Here’s how:
- Use dairy-free cream cheese (such as Kite Hill or Violife).
- Swap the whipped topping for coconut whipped cream.
- Make a crust using crushed gluten-free cookies or nuts.
6. Can I freeze No-Bake Banana Split Cake?
While technically you can freeze it, I don’t recommend it because the texture of the fresh fruit and cream cheese filling can change once thawed. Instead, store it in the fridge and enjoy it fresh!
7. What’s the best way to serve this dessert?
For the best experience:
- Serve it chilled straight from the fridge.
- Slice it with a sharp knife for clean cuts.
- Garnish with extra whipped topping, chocolate drizzle, and cherries just before serving for that classic banana split look.
Final Thoughts: Why You’ll Love This No-Bake Banana Split Cake
This No-Bake Banana Split Cake is the perfect dessert for anyone who loves fruity, creamy, and easy-to-make treats. Whether you’re making it for a summer party, a family gathering, or just a sweet indulgence for yourself, it’s guaranteed to impress.
- No baking required – Perfect for hot summer days!
- A fun twist on a classic banana split – All the flavors you love in an easy, sliceable cake.
- Customizable – Add your own favorite toppings and flavors.
- Make-ahead friendly – Perfect for entertaining!
So what are you waiting for? Go grab those bananas, whip up this delightful treat, and enjoy every creamy, chocolate-drizzled bite!
Happy no-baking!
Print
NO-BAKE BANANA SPLIT CAKE
- Total Time: 4 hours, 20 mins
Description
This No-Bake Banana Split Cake is a creamy, fruity, and chocolatey dessert that brings all the flavors of a classic banana split in cake form! With a buttery graham cracker crust, a rich cream cheese filling, and layers of bananas, pineapple, and strawberries, it’s the perfect make-ahead treat for any occasion.
Ingredients
For the Crust:
- 2 cups graham cracker crumbs
- 1/3 cup unsalted butter, melted
- 1 tsp salt
For the Filling:
- 16 oz cream cheese, softened
- 1/2 cup granulated sugar
- 8 oz whipped topping (Cool Whip)
- 1 tsp vanilla extract
For the Toppings:
- 3 to 4 bananas, sliced
- 20 oz can crushed pineapple, well-drained
- 20 oz strawberries, sliced
- 8 oz whipped topping (Cool Whip)
- 1/2 cup chopped hazelnuts
- Chocolate sauce
Instructions
1️⃣ Prepare the Crust:
In a medium bowl, mix the graham cracker crumbs, melted butter, and salt until well combined.
Press the mixture firmly into the bottom of a greased 9×13-inch baking dish.
Refrigerate while preparing the filling.
2️⃣ Make the Filling:
In a large bowl, beat the softened cream cheese with sugar and vanilla extract until smooth and creamy.
Gently fold in the whipped topping until fully incorporated.
Spread the filling evenly over the chilled crust.
3️⃣ Add the Layers:
Arrange a layer of banana slices over the cream cheese filling.
Evenly spread the well-drained crushed pineapple over the bananas.
Add a layer of sliced strawberries on top of the pineapple.
4️⃣ Top and Chill:
Spread another layer of whipped topping over the strawberries.
Drizzle with chocolate sauce and sprinkle with chopped hazelnuts.
Cover with plastic wrap and refrigerate for at least 4 hours or overnight to allow flavors to meld and the cake to set.
5️⃣ Serve:
Slice and serve the cake chilled. Enjoy this refreshing, no-bake treat!
Notes
- Make sure to drain the pineapple well to avoid excess moisture in the cake.
- You can swap hazelnuts for pecans, walnuts, or almonds based on preference.
- For extra indulgence, top with maraschino cherries before serving!
- This cake can be stored in the refrigerator for up to 3 days.
- Prep Time: 20 mins
- Cook Time: 4 hours
