


If you’ve ever daydreamed about sinking your fork into a silky pool of chocolate custard nestled inside a tender, flaky crust, you’re in for a treat. I still remember the first time I made this Old-Fashioned Chocolate Pie—it was on a rainy afternoon when all I wanted was comfort in dessert form. As the rich aroma of cocoa swirled through the kitchen, I couldn’t help but feel a little transported back to Grandma’s house, where pies were more than just treats—they were memories. Today, I’m excited to share the secrets behind this classic recipe, so you can create that same nostalgic magic in your own kitchen.
This pie feels fancy enough for company yet simple enough for a weeknight splurge. The secret? A no-fuss filling that cooks up on the stovetop in about 10 minutes and a crust that you can grab from the store for a shortcut—or make from scratch if you’re feeling ambitious. Either way, the payoff is incredible: a glossy, smooth chocolate custard that sets up perfectly overnight. Let’s dive in and whip up a slice of pure chocolate bliss.
Ingredients You’ll Need
Before we get started, gather these pantry staples:
-
Pie crust: 1 unbaked 9″ crust (homemade or store-bought)
-
Granulated sugar: 1 cup
-
Unsweetened cocoa powder: ¼ cup
-
Cornstarch: ¼ cup (or swap for ⅓ cup all-purpose flour if you like a slightly thicker filling)
-
Salt: ¼ teaspoon
-
Egg yolks: 3 large
-
Whole milk: 2 cups
-
Vanilla extract: 1 teaspoon
-
Unsalted butter: 2 tablespoons, cut into pieces
Optional Topping: whipped cream or soft meringue, plus chocolate shavings or a light dusting of cocoa powder to finish.
Step 1: Blind-Bake the Crust
-
Preheat your oven to 375 °F (190 °C).
-
Fit the pie crust into a 9″ pan, crimp the edges for that classic look, then line with parchment paper. Fill with pie weights or dried beans.
-
Bake for 12–15 minutes, until the edges turn a lovely golden hue. Remove the weights and parchment, then return the crust to the oven for another 5 minutes so the bottom sets up and won’t get soggy once the filling goes in.
-
Transfer to a wire rack and cool completely. A fully cooled crust will help keep your custard smooth and firm.
Tip: If you’re using a store-bought crust, check the package instructions—sometimes they recommend a slightly different bake time. Just keep an eye on those edges!

Step 2: Whisk Together the Dry Ingredients
While your crust is chilling, let’s get the filling underway. In a medium-sized saucepan, whisk together:
-
1 cup granulated sugar
-
¼ cup unsweetened cocoa powder
-
¼ cup cornstarch (or ⅓ cup flour)
-
¼ teaspoon salt
Aim for a uniform mixture with no cocoa clumps. This step ensures that when the milk goes in, everything dissolves evenly and your custard heats up without any gritty surprises.

Step 3: Blend Yolks and Milk
In a separate bowl, crack in 3 large egg yolks and pour in 2 cups of whole milk. Whisk vigorously until the mixture is smooth and pale, with no streaks of yolk. This little pre-mix prevents the yolks from cooking into ribbons when they hit the hot pan and keeps your custard luxuriously smooth.
Step 4: Cook the Custard
-
Position your saucepan over medium heat. Pour in the milk-and-yolk mixture, stirring constantly to incorporate the dry blend of sugar, cocoa, cornstarch, and salt.
-
Keep the whisk or heat-proof spatula moving in gentle, sweeping motions—this prevents scorching on the bottom and ensures an even thickness.
-
Within 8–10 minutes, you’ll notice the mixture begins to thicken and tiny bubbles forming at the edges. That’s your cue: as soon as you see a steady ribbon forming when you drag your spatula through the custard, remove the pan from heat.
Why less heat is better: Cooking too rapidly can cause the custard to seize or develop lumps. A patient simmer yields a silkier texture and richer flavor.
Step 5: Finish the Filling
-
Off the heat, whisk in 1 teaspoon of vanilla extract. The warm custard will bloom the vanilla, deepening its aroma.
-
Add the 2 tablespoons of unsalted butter, piece by piece. Stir until each cube has melted and the surface gleams like molten chocolate.
-
Taste a dab of the custard—if you prefer it a touch sweeter, now’s the moment to whisk in a teaspoon more sugar; if you crave extra chocolate intensity, sift in a dusting of cocoa powder and whisk until smooth.
Step 6: Fill & Chill
-
Carefully pour the warm custard into your fully cooled pie shell, smoothing the top with an offset spatula or the back of a spoon.
-
Let the pie cool on the counter for 20–30 minutes to release some of its steam. Then, press a layer of plastic wrap directly onto the custard surface—this simple trick prevents a skin from forming as it chills.
-
Refrigerate for at least 4 hours, though overnight is ideal. Chilling time is crucial: it allows the cornstarch (or flour) to set fully, giving you clean slices and that unmistakable “slice of heaven” mouthfeel.
Step 7: Top & Serve
-
When you’re ready to serve, dollop or pipe a generous layer of softly whipped cream or a billowy meringue.
-
For the final flourish, use a vegetable peeler to shave a high-quality chocolate bar over the top, or dust lightly with cocoa powder for a polished finish.
-
Slice with a sharp, clean knife—wiping the blade between cuts ensures neat edges—and serve chilled.
Chef’s Shortcuts & Variations
-
Crust swap: If you’re short on time, a graham-cracker or chocolate cookie crumb crust elevates the flavor and skips blind-baking altogether. Simply press prepared crumbs mixed with melted butter into the pan, chill briefly, then fill.
-
Dairy-free option: Replace whole milk with canned coconut milk for a tropical twist. The custard will be slightly richer and carry a hint of coconut without overwhelming the chocolate.
-
Intensity adjusters: For an extra-dark version, replace 2 tablespoons of sugar with an equal amount of Dutch-process cocoa powder. The custard will be darker, deeper, and slightly less sweet.
-
Mini pies: Divide the filling among four 4″ tart pans for individual servings. Adjust chilling time to 2–3 hours—perfect for dinner parties or when portion control is key.
-
Alcohol infusion: Gently stir in a tablespoon of your favorite liqueur—think coffee liqueur, orange curaçao, or amaretto—right after removing the pan from heat. It adds an adult-only nuance that’s unexpectedly delightful.

Frequently Asked Questions
1. Can I make the pie a day or two in advance?
Absolutely! In fact, I often prepare mine the night before serving. Once the custard has set (at least 4 hours, ideally overnight), cover the pie loosely with foil or a pie dome and refrigerate. This “make-ahead” approach actually deepens the flavor and gives you more time to enjoy your guests.
2. My custard turned out lumpy—what went wrong?
Lumps usually mean the heat was too high or the dry ingredients weren’t fully dissolved before cooking. Next time, whisk the sugar, cocoa, and cornstarch until no visible granules remain, then add the milk-yolk mix slowly, stirring constantly over moderate heat. Patience is key!
3. How do I prevent a soggy bottom crust?
Blind-baking the crust thoroughly is your best defense. Make sure you bake with weights for 12–15 minutes, remove them, then bake an additional 5 minutes so the bottom seals. Cooling the crust completely before filling also helps prevent steam from softening the base.
4. Can I use low-fat or plant-based milk instead of whole milk?
Yes, but the texture and flavor will shift slightly. Low-fat milk tends to yield a thinner custard, so you might need an extra tablespoon of cornstarch. For a dairy-free version, full-fat coconut milk works beautifully—your pie will have a subtle coconut undertone that complements the chocolate.
5. What’s the best way to store leftover slices?
Store any extra slices in an airtight container in the refrigerator for up to 3–4 days. If you find the whipped topping weeps a bit over time, just give it a quick re-whip before serving.
6. Can I freeze Old-Fashioned Chocolate Pie?
You can, though I recommend freezing individual slices rather than the whole pie. Wrap each slice tightly in plastic wrap and then foil, and freeze for up to one month. Thaw in the refrigerator overnight, then bring to room temperature before topping with fresh whipped cream.
7. Why did my pie crack on top when I used meringue?
Meringue can crack if it cools too quickly. After broiling or torching your meringue peaks, let the pie sit at room temperature for about 15–20 minutes before refrigerating. This gradual temperature change helps prevent dramatic shrinkage and cracking.
Conclusion
There you have it—your step-by-step guide to mastering that dreamy Old-Fashioned Chocolate Pie. From blind-baking the crust to whisking your way to a glossy custard and topping it off with pillowy whipped cream, this recipe is all about simple techniques that deliver nostalgic, crowd-pleasing results.
I hope this article has given you the confidence (and maybe a little chocolate craving) to dive right in. When you take that first bite—rich, smooth custard against a flaky shell—I promise you’ll feel like you’ve stepped back to Grandma’s kitchen, where every slice was served with love.
Give it a try, and let me know how it turns out! Drop a comment below with your favorite twist—perhaps you stirred in espresso powder for an adult kick, or swapped in coconut milk for a dairy-free delight. Your feedback and creative variations are what make this community so special. Happy baking, and here’s to many more chocolate memories!
Print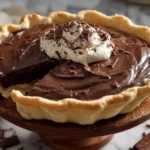
- Total Time: 4 hours 40 minutes
Description
A rich, silky-smooth chocolate custard nestled in a tender, flaky crust—this classic dessert is pure nostalgia in every bite.
Ingredients
For the Pie Crust
- 1 unbaked 9″ pie crust (homemade or refrigerated store-bought)
For the Chocolate Filling
- 1 cup granulated sugar
- ¼ cup unsweetened cocoa powder
- ¼ cup cornstarch (or ⅓ cup all-purpose flour for extra thickness)
- ¼ tsp salt
- 3 large egg yolks
- 2 cups whole milk
- 1 tsp vanilla extract
- 2 Tbsp unsalted butter, cut into pieces
For the Topping (Optional)
- Whipped cream or soft meringue
- Chocolate shavings or a dusting of cocoa powder
Instructions
1️⃣ Blind-bake the crust
Preheat your oven to 375 °F (190 °C). Fit the crust into a 9″ pie pan, crimp the edges, line with parchment, and fill with pie weights (or dried beans). Bake 12–15 minutes until edges are golden, remove weights and paper, then bake 5 more minutes. Cool completely.
2️⃣ Combine dry ingredients
In a medium saucepan, whisk together sugar, cocoa powder, cornstarch, and salt until evenly blended.
3️⃣ Whisk yolks and milk
In a separate bowl, whisk the egg yolks and milk until smooth and no streaks of yolk remain.
4️⃣ Cook the custard
Slowly pour the milk mixture into the saucepan, whisking constantly to dissolve the dry ingredients. Set over medium heat and stir continuously with a heat-proof spatula or whisk until the mixture thickens and just begins to bubble—about 8–10 minutes.
5️⃣ Finish the filling
Remove from heat. Stir in vanilla extract and butter pieces until the butter is fully melted and the custard is glossy and smooth.
6️⃣ Fill and chill
Pour the warm custard into the cooled crust, smoothing the top. Let cool to room temperature, then cover with plastic wrap (press wrap onto the surface to prevent a skin) and refrigerate at least 4 hours, preferably overnight, until fully set.
7️⃣ Top and serve
Just before serving, add a layer of whipped cream or dollops of meringue. Garnish with chocolate shavings or a light dusting of cocoa powder. Slice and enjoy!
Notes
- Crust choices: Homemade crust yields the best flavor, but a high-quality store-bought crust works in a pinch.
- Prevent lumps: Whisk constantly when combining milk into dry ingredients and while cooking to ensure a silk-smooth custard.
- Overnight chilling: For clean slices and maximum flavor development, chill the pie overnight.
- Prep Time: 20 minutes
- Cook Time: 4 hours 20 minutes
Nutrition
- Serving Size: 8
