

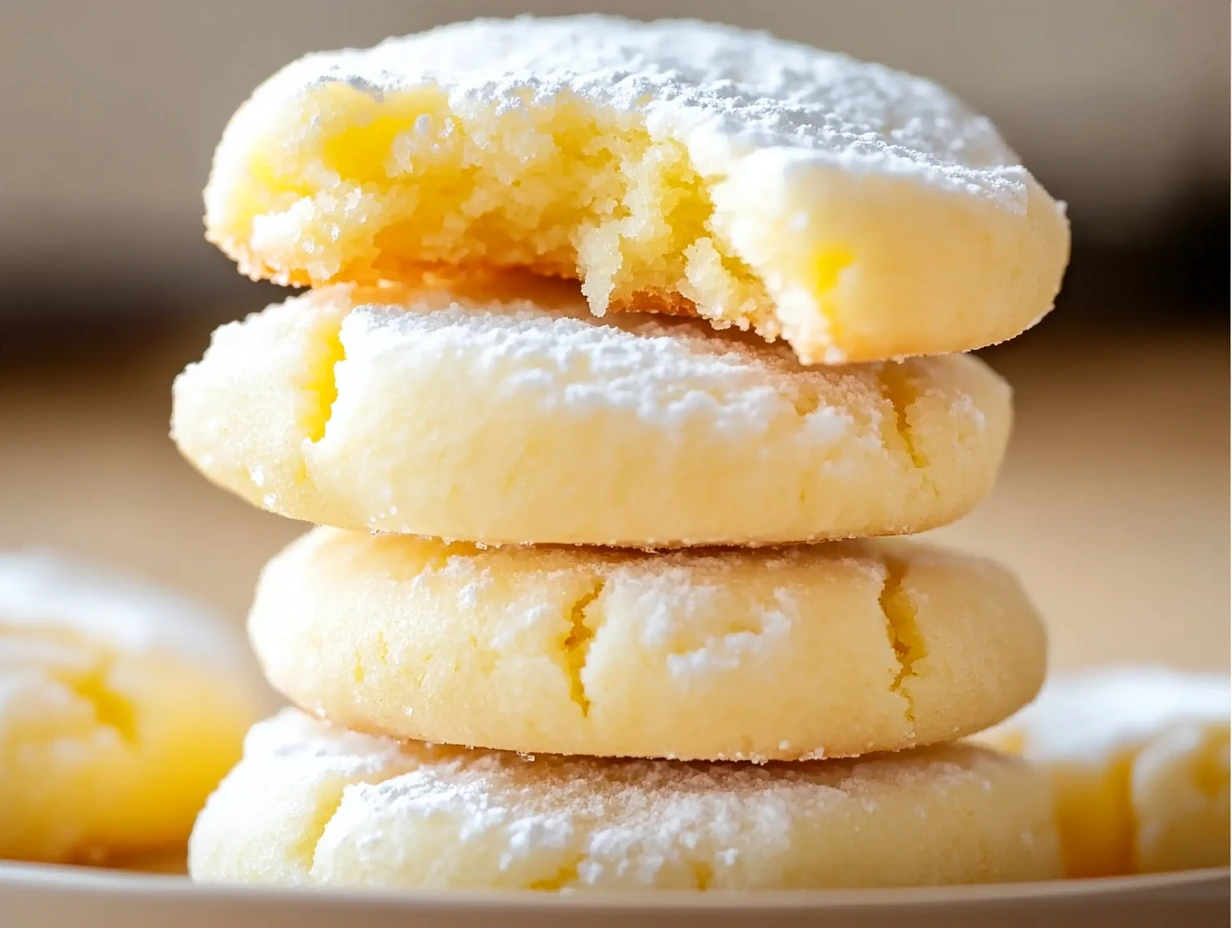
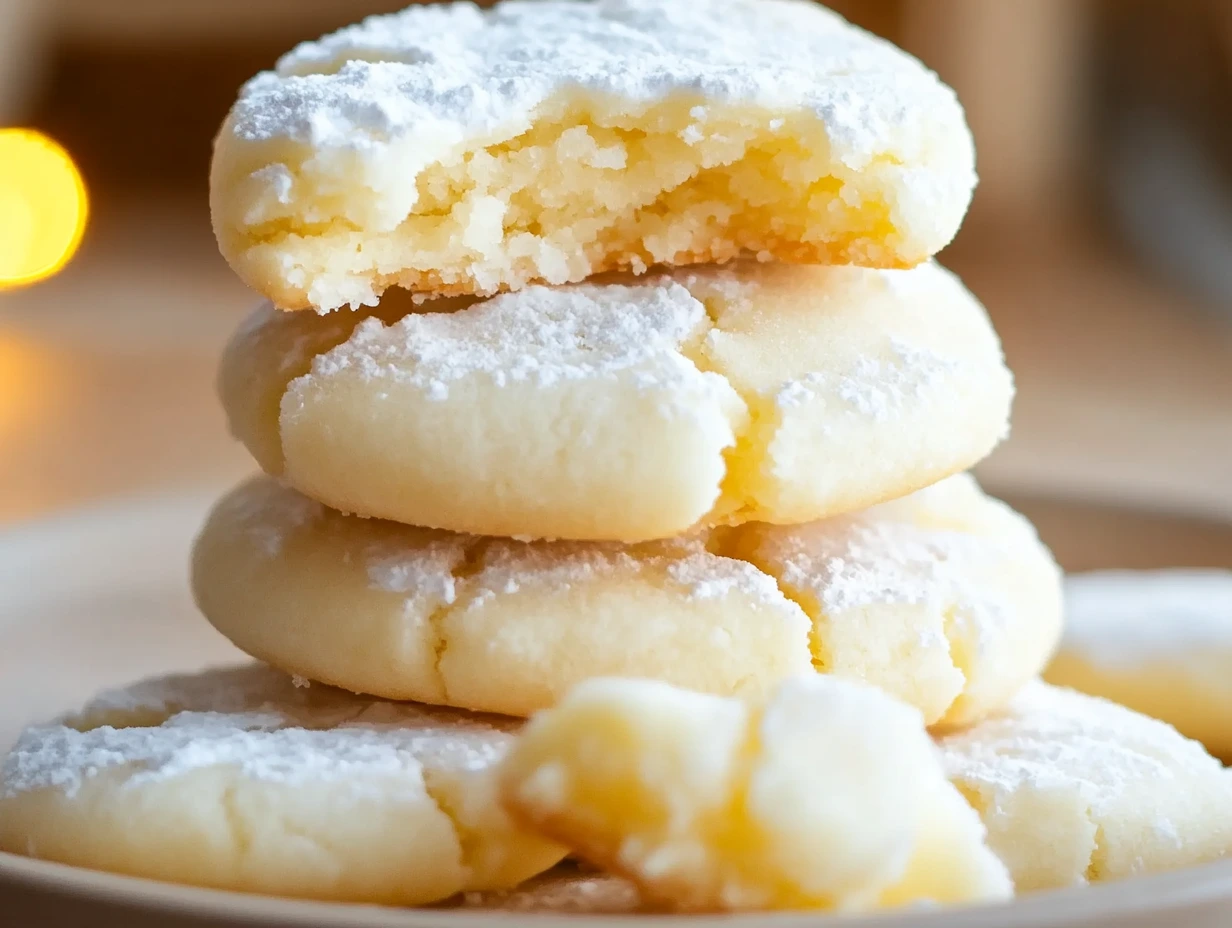
Is there anything more satisfying than a cookie that actually melts in your mouth? These Zesty Lemon Meltaway Cookies are a total win in our house—and not just because they’re delicious. They’re light, citrusy, and come together so easily that you’ll find yourself making them on repeat. Think of these as the ultimate sunshine cookie. Whether it’s the middle of spring or you just need a little bright spot in your day, these little gems have your back.
I first made these cookies on a whim during a gloomy Sunday afternoon. We had a couple lemons sitting on the counter, and I figured—why not? What started as a quick bake to pass the time turned into an instant family favorite. Now, these cookies are part of our regular rotation, especially around Easter, bridal showers, or any time we’re craving something light and lemony.
So let’s get right into it, because once you see how simple these are to make, you’ll be preheating your oven in no time.
INGREDIENTS YOU’LL NEED
Let’s start with what you need to get baking. This recipe is beautifully straightforward—no fancy techniques or hard-to-find ingredients here.
For the Cookies:
-
1 cup unsalted butter, softened
-
1/2 cup powdered sugar, sifted
-
1 tsp vanilla extract
-
Zest of 2 lemons (about 2 tbsp)
-
2 tbsp fresh lemon juice
-
2 cups all-purpose flour
-
1/4 tsp salt
For the Coating:
-
1 cup powdered sugar, sifted (for rolling)
STEP 1: PREHEAT THAT OVEN
First things first—go ahead and preheat your oven to 350°F (that’s 175°C if you’re outside the U.S.). Line a baking sheet with parchment paper or use a silicone baking mat if you have one. This helps prevent sticking and keeps the cookies from over-browning on the bottom.
STEP 2: CREAM THE BUTTER AND SUGAR
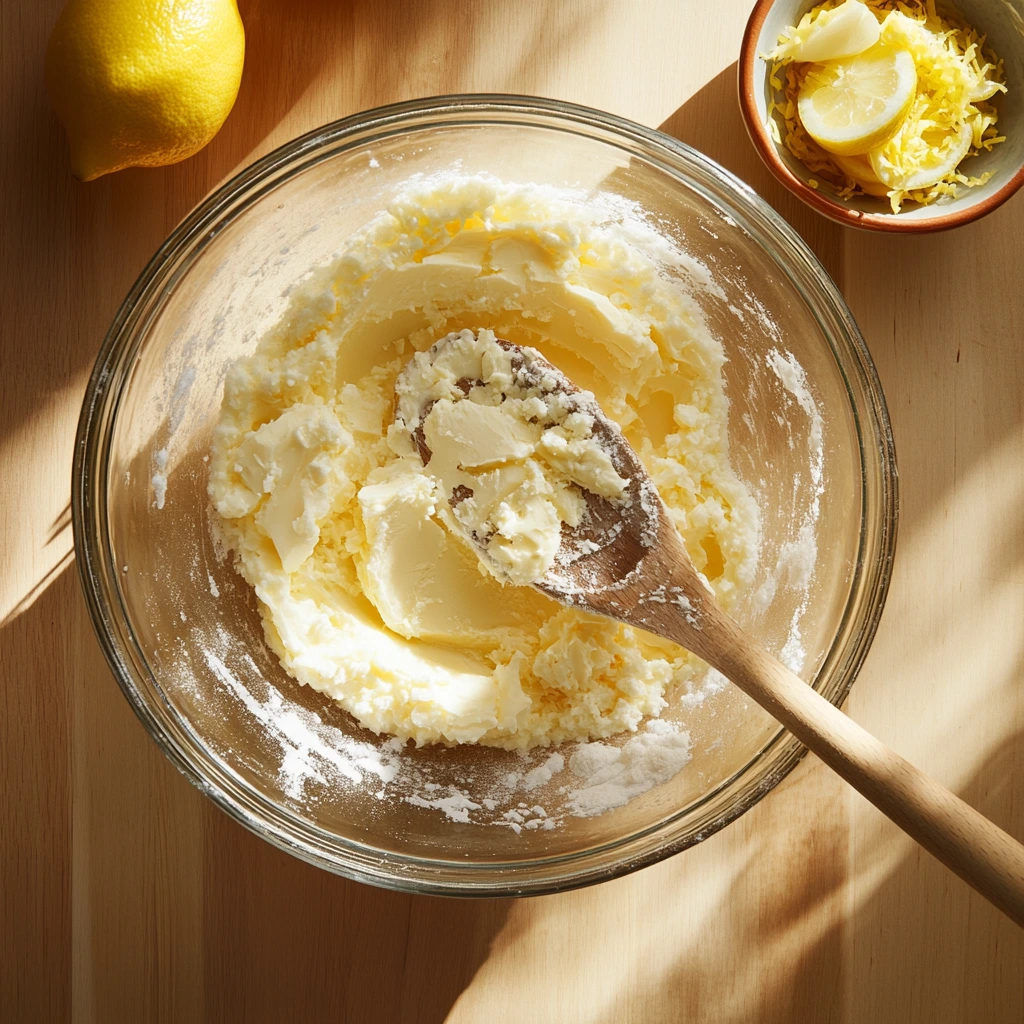
In a large mixing bowl, cream together the softened butter and sifted powdered sugar until the mixture is light, smooth, and fluffy. This should take about 2-3 minutes with a hand mixer or stand mixer. You’re looking for that pale, whipped texture—it’s the base of your meltaway magic.
Then, add in the vanilla extract, lemon zest, and fresh lemon juice. Stir just until everything is well incorporated and your kitchen smells like a citrus grove. It’s a sensory moment, for sure.
STEP 3: MIX IN THE DRY INGREDIENTS
Gradually add the flour and salt, mixing just until a soft dough forms. Don’t overmix here—once the flour disappears into the dough, you’re good to go. Overworking the dough can make the cookies tough, and we’re going for tender and delicate.
You’ll notice the dough has a lovely lemony aroma, and it should be soft but not sticky. If it feels too warm or soft, you can pop it in the fridge for 10–15 minutes to make it easier to handle.
STEP 4: SHAPE THE COOKIES
Scoop out tablespoon-sized portions of dough and roll them into balls. Place each one on your prepared baking sheet about 2 inches apart to give them a little room to spread. If you want that classic meltaway look, gently press down on the tops of each cookie with your fingers or the bottom of a glass—just enough to flatten slightly.
At this point, the cookies already look like little bites of sunshine, and they haven’t even hit the oven yet!
STEP 5: BAKE TO PERFECTION
Slide your baking sheet into the preheated 350°F oven and bake the cookies for 10 to 12 minutes. You’re not looking for browned or crisp edges here—these cookies should remain soft and tender, with only the faintest touch of golden color around the bottom edges.
Every oven is a little different, so I like to start checking mine at around the 9-minute mark. You’ll know they’re done when they look set in the center and are no longer glossy on top. Be careful not to overbake; if they get too much color, they lose that delicate, melt-in-your-mouth quality.
Once they’re baked, remove the cookies from the oven and let them sit on the baking sheet for about 5 minutes. This helps them firm up just enough to transfer without falling apart.
After that short rest, gently move the cookies to a wire cooling rack and let them cool completely. And yes, waiting is the hardest part—especially with that fresh lemon scent filling the kitchen!
STEP 6: COAT IN POWDERED SUGAR
Now comes the fun part: making them look as magical as they taste.
Once your cookies are fully cooled, roll each one in sifted powdered sugar. Be generous here—you want a thick, snowy coating that clings to the delicate surface. If you’re serving these for a party or want that extra-pretty finish, roll them again just before plating. It gives them a beautiful frosted look that’s hard to resist.
If you’re storing them for later, keep them in an airtight container and add a fresh dusting of powdered sugar right before serving. It gives them that just-baked sparkle every time.
BAKING TIPS & VARIATIONS FOR THE BEST COOKIES
This recipe is super reliable as written, but there are a few little tweaks and tricks you can try if you want to customize your cookies or add even more citrus flair.
Don’t skip the lemon zest:
The zest is where most of the lemon flavor lives. It adds a bright, concentrated citrus punch that lemon juice alone just can’t match.
Use a cookie scoop:
To keep your cookies uniform in size and help them bake evenly, use a small cookie scoop when portioning the dough. It also saves time and makes cleanup easier.
Make them ahead:
The dough can be made in advance and stored in the fridge for up to 48 hours. You can also freeze the dough balls and bake them straight from frozen—just add a minute or two to the baking time.
Try other citrus flavors:
Feeling adventurous? Swap out the lemon for orange or lime. You can even mix lemon and lime zest together for a fun citrus blend. Just keep the quantities the same.
Add a glaze (optional):
If you want a slightly fancier version, skip the powdered sugar coating and instead drizzle a simple lemon glaze on top. Mix 1 cup powdered sugar with 1–2 tablespoons of lemon juice until smooth, then drizzle over the cooled cookies.
TROUBLESHOOTING COMMON COOKIE MISHAPS
Even the simplest cookie recipes can have hiccups. Here are a few common issues and how to fix them:
-
Cookies spreading too much?
Make sure your butter wasn’t too soft or melted when you started. A quick chill of the dough before baking can also help. -
Cookies too dry or crumbly?
Double-check your flour measurements—too much flour is often the culprit. Make sure you’re spooning the flour into your measuring cup and leveling it off, not scooping straight from the bag. -
Powdered sugar melting into the cookies?
Only coat the cookies once they’re completely cooled. If they’re even slightly warm, the sugar will absorb into the surface instead of staying powdery and pretty.
FREQUENTLY ASKED QUESTIONS
1. Can I use bottled lemon juice instead of fresh?
Fresh lemon juice is always the best choice because it has a brighter, more natural flavor. Bottled lemon juice can taste a bit flat or sour. If you’re in a pinch, it will work—but fresh is definitely worth the extra minute.
2. How long do lemon meltaway cookies stay fresh?
Stored in an airtight container at room temperature, these cookies stay fresh for about 4 to 5 days. If you want them to last longer, you can refrigerate them for up to a week or freeze them for up to 2 months.
3. Can I freeze the dough?
Absolutely! You can roll the dough into balls and freeze them on a baking sheet. Once they’re solid, transfer them to a zip-top freezer bag. Bake straight from frozen—just add an extra minute or two to the baking time.
4. Why did my cookies spread too much?
Usually, this means your butter was too soft or slightly melted before mixing. Try chilling the dough for 20–30 minutes before baking. It helps the cookies hold their shape better.
5. Can I skip the powdered sugar coating?
You can, but the coating adds sweetness and texture that really makes these cookies shine. If you prefer, you can dust them lightly instead of rolling them, or go for a simple lemon glaze for a different finish.
6. Are these cookies gluten-free?
Not as written. However, you can try using a 1:1 gluten-free flour blend made for baking. Keep in mind that texture may vary slightly depending on the brand.
7. Can I add poppy seeds or herbs like thyme?
Yes! A teaspoon of poppy seeds or a tiny pinch of fresh thyme adds a fun twist to these cookies without overpowering the lemon flavor. Just keep additions light so the cookies stay tender.
FINAL THOUGHTS: SHARE, SAVE, AND MAKE AGAIN
These Zesty Lemon Meltaway Cookies are one of those recipes that just stick with you. They’re the kind of cookie you crave with a cup of tea, the ones you wrap in a little box as a sweet gift, and the ones that somehow disappear from the counter faster than you expected.
They’re easy enough to make on a weekday afternoon, yet special enough to bring to a brunch, baby shower, or holiday table. That melt-in-your-mouth texture combined with the vibrant citrus flavor is what makes them a favorite in our house—and I’m betting they’ll become a staple in yours, too.
If you give these a try, I’d love to hear how they turned out for you! Did you add a twist or stick with the classic version? Drop a comment below and let me know what you think—and if you snapped a picture, definitely share it. There’s nothing better than seeing your beautiful bakes come to life.
Until next time, happy baking—and may your cookies always be buttery, bright, and bursting with lemony goodness.
ZESTY LEMON MELTAWAY COOKIES
- Total Time: 27 minutes
Description
Bright, buttery, and bursting with citrus flavor, these lemon meltaway cookies live up to their name—tender, delicate, and melt-in-your-mouth delicious. Perfect for spring gatherings or as a light, sweet finish to any meal.
Ingredients
For the Cookies:
- 1 cup unsalted butter, softened
- 1/2 cup powdered sugar, sifted
- 1 tsp vanilla extract
- Zest of 2 lemons (about 2 tbsp)
- 2 tbsp fresh lemon juice
- 2 cups all-purpose flour
- 1/4 tsp salt
For the Coating:
- 1 cup powdered sugar, sifted (for rolling)
Instructions
1️⃣ Preheat the oven:
Preheat your oven to 350°F (175°C). Line a baking sheet with parchment paper or a silicone baking mat.
2️⃣ Make the dough:
In a large mixing bowl, cream together the softened butter and powdered sugar until light and fluffy.
Mix in the vanilla extract, lemon zest, and lemon juice until fully incorporated.
Gradually add the flour and salt, mixing just until a soft dough forms. Do not overmix.
3️⃣ Shape the cookies:
Scoop out tablespoon-sized amounts of dough and roll into balls. Place them on the prepared baking sheet about 2 inches apart.
(Optional) Gently flatten each ball slightly with your fingers or the bottom of a glass.
4️⃣ Bake:
Bake for 10–12 minutes, or until the edges are just starting to turn golden. The centers should remain pale.
Let cookies cool on the baking sheet for 5 minutes before transferring to a wire rack.
5️⃣ Coat with powdered sugar:
Once the cookies are completely cooled, roll them generously in powdered sugar.
For an extra snowy finish, roll them again right before serving.
Notes
- Butter Matters: Make sure your butter is softened, not melted. This helps create the tender texture that makes these cookies “meltaway.”
- Don’t Overmix: After adding the flour, mix only until combined. Overmixing can lead to dense cookies.
- Extra Lemon Zing: For a more intense lemon flavor, add a few drops of lemon extract or increase the lemon zest slightly.
- Prep Time: 15 minutes
- Cook Time: 12 minutes
Nutrition
- Serving Size: 24–30 cookies
