

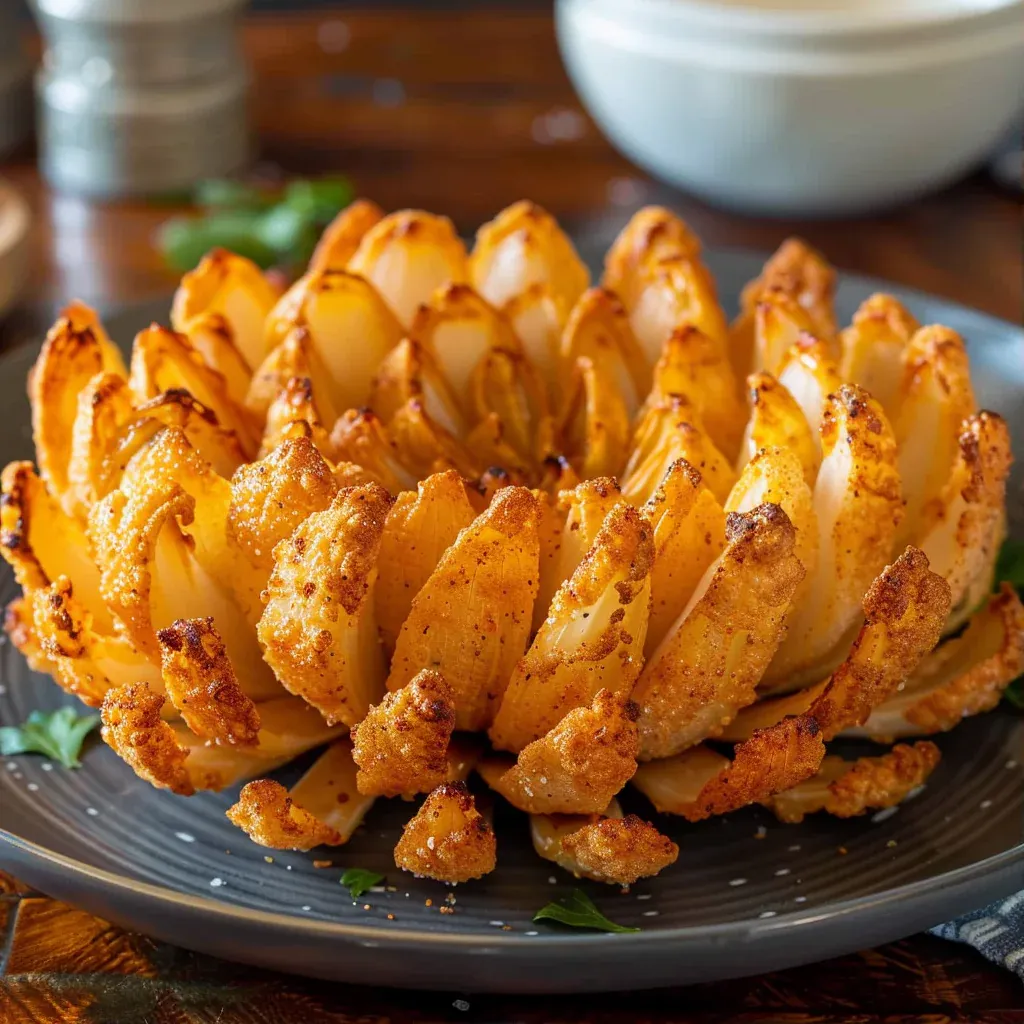
Homemade Bloomin’ Onion is a fantastic way to bring a touch of restaurant flair right into your kitchen. As you slice into that beautifully opened onion, the aroma fills the air with hints of spices and fried goodness. The crispy exterior gives way to tender onion petals, and when paired with a zesty dipping sauce, it’s a flavor explosion that’s perfect for sharing at a weeknight dinner or as a show-stopping appetizer at your next gathering. Trust me, once you try this recipe, you’ll want to make it again and again!
- Why This Recipe Is Worth Your Time
- Main Ingredients
- Tools Needed
- Step-by-Step Instructions
- Pro Tips for Perfect Homemade Bloomin’ Onion
- Serving Ideas and Pairings
- Variations and Swaps for Homemade Bloomin’ Onion
- Leftovers and Storage Tips
- Nutrition Notes
- Frequently Asked Questions About Homemade Bloomin’ Onion
Why This Recipe Is Worth Your Time
This Homemade Bloomin’ Onion is worth every minute you invest in it. The balance of spices creates a flavorful crust that enhances the sweet profile of the onion. Not only is it visually impressive, but the crispy texture combined with the tender onion petals makes for a delightful contrast. Plus, making it at home means you can customize the seasoning to your liking and enjoy it fresh from the fryer. Impress your friends and family with this fun appetizer that everyone will love!
Main Ingredients for Homemade Bloomin’ Onion
Here’s a quick look at the main ingredients that go into making your Homemade Bloomin’ Onion, along with their roles:
- 1 large Vidalia or sweet onion: The star of the dish, providing sweetness and a tender texture.
- 2 ½ cups all-purpose flour: Creates the crispy coating that gives the onion its signature crunch.
- 2 tsp smoked paprika: Adds a smoky depth and color to the breading.
- 1 tsp garlic powder: Enhances the flavor with a hint of garlic essence.
- ½ tsp dried oregano: Adds a touch of herbaceous flavor to the mix.
- 2 large eggs: Acts as a binding agent in the egg wash for the onion.
- 1 cup whole milk: Provides creaminess to the egg wash, helping the flour adhere better.
- Vegetable oil for deep frying: Essential for achieving that deep-fried crispiness.
- Salt and black pepper to taste: Enhances all the flavors in the dish.
Tools Needed for Homemade Bloomin’ Onion
| Tool | Purpose / what it helps with |
| Sharp knife | For slicing the onion into petals. |
| Large mixing bowls | For combining the flour mixture and the egg wash. |
| Deep pot or fryer | For frying the onion to a perfect golden brown. |
| Whisk | For mixing the egg wash and flour mixture. |
| Slotted spoon | To carefully lower and remove the onion from the hot oil. |
| Paper towels | For draining excess oil from the fried onion. |
Step-by-Step Instructions for Homemade Bloomin’ Onion
Ready to dive into making your Homemade Bloomin’ Onion? Here’s a simple breakdown of the steps:
- Begin by slicing off the top of the onion and peeling away the outer skin. Position the onion root-side down and make 4 vertical cuts, ensuring the root remains intact. Continue cutting between the segments until you have 16 evenly spaced petals. This technique allows the onion to bloom beautifully.
- Gently immerse the onion in ice water for 10 minutes to encourage the petals to open, then thoroughly pat it dry. This step is crucial for achieving that signature bloom.
- In a large mixing bowl, combine the flour, smoked paprika, garlic powder, dried oregano, salt, and black pepper, whisking them together until well mixed.
- In a separate bowl, whisk the eggs and whole milk together until well combined. This mixture will help the flour adhere to the onion.
- Dip the onion into the flour mixture, making sure each petal is coated. Then, immerse it in the egg wash before coating it thoroughly in the flour mixture a second time. This double coating is key for a crispy texture.
- Heat vegetable oil in a deep pot to 375°F. Carefully lower the onion into the oil, ensuring the root side is facing up. This positioning helps the onion to bloom as it cooks.
- Fry the onion for 3 minutes, then carefully flip it over and fry for another 3 minutes until it turns golden brown and crispy. Keep an eye on it to make sure it doesn’t burn!
- Once cooked, drain the onion on paper towels and serve it warm alongside a spicy dipping sauce for an extra kick.
Pro Tips for Perfect Homemade Bloomin’ Onion
- Choose a large, firm onion for the best results, as it will hold its shape better when sliced.
- Make sure the oil is hot enough before adding the onion; a thermometer is handy here!
- Don’t rush the frying process. Frying at the right temperature ensures a crispy exterior without overcooking the onion.
- Try adding a pinch of cayenne pepper to the flour mixture for extra heat.
- Let the onion soak in ice water for the full 10 minutes to ensure it blooms properly.
- Keep the frying area tidy and have a slotted spoon ready for easy removal.
- Experiment with different herbs and spices in the flour mixture for unique flavors.
Serving Ideas and Pairings
- Serve with a spicy ranch or zesty dipping sauce for the perfect complement.
- Pair it with a fresh garden salad to balance the richness.
- Serve it as a starter with your favorite cocktail or mocktail.
- Try with homemade garlic aioli for a gourmet twist.
- Serve alongside a platter of fresh vegetables for a fun appetizer spread.
Variations and Swaps for Homemade Bloomin’ Onion
Faster Weeknight Version
For a quicker version, consider using frozen pre-breaded onion rings. Just bake or fry according to package instructions and serve with your favorite dipping sauce.
Lighter Version
For a lighter take, you can bake the onion instead of frying. Simply coat the onion as directed, place it on a baking sheet, spray lightly with cooking oil, and bake at 400°F until golden brown and crispy.
High-Protein Version
Add some finely chopped cooked chicken or shrimp to the flour mixture for a protein boost while maintaining the crispy texture.
Budget-Friendly Version
Use a smaller onion or even shallots for a more cost-effective version that still packs a punch on flavor.
Leftovers and Storage Tips
- Leftover bloomin’ onion can be stored in an airtight container in the fridge for up to 3 days.
- To reheat, place it in a preheated oven at 350°F for about 10-15 minutes until warmed through and crispy.
- For best results, avoid microwaving as it can make the onion soggy.
- This dish does not freeze well due to the texture of the fried onion.
Nutrition Notes
This Homemade Bloomin’ Onion offers a delightful treat, but be mindful of portion sizes, especially if you’re watching calories. Each serving contains a balance of carbohydrates, fats, and protein derived from the breading and onion. For a healthier option, consider reducing the amount of flour and using whole wheat flour instead. Adjust spices according to your dietary preferences or allergies, and enjoy this dish as an occasional indulgence!
Frequently Asked Questions About Homemade Bloomin’ Onion
Can I make Homemade Bloomin’ Onion in advance?
While it’s best served fresh, you can prepare the onion and the breading mixture ahead of time, then fry it just before serving.
How do I ensure my Homemade Bloomin’ Onion is crispy?
Make sure the oil is hot enough before frying and double coat the onion in the flour mixture for extra crunch.
What can I serve with Homemade Bloomin’ Onion?
It pairs well with spicy dipping sauces, ranch dressing, or even a garlic aioli for a delicious contrast.
Is Homemade Bloomin’ Onion gluten-free?
This recipe is not gluten-free, but you can substitute the all-purpose flour with a gluten-free flour blend.
How do I know when the Homemade Bloomin’ Onion is done frying?
The onion is done when it is golden brown and crispy on the outside. Keep an eye on it to prevent burning!
Now that you have all the details, I encourage you to try making this Homemade Bloomin’ Onion! It’s a fun and delicious project that you can enjoy with friends and family. Enjoy the process, and don’t forget to savor every crispy bite!

Homemade Bloomin’ Onion Delight
- Total Time: 45 minutes
- Yield: 4 servings 1x
Description
This delicious homemade bloomin’ onion delight is a fantastic dish that’s sure to impress. Made with 1 large vidalia or sweet onion, 2 ½ cups all-purpose flour, and 2 tsp smoked paprika, it combines great flavors and textures for a memorable meal.
Ingredients
- 1 large Vidalia or sweet onion
- 2 ½ cups all-purpose flour
- 2 tsp smoked paprika
- 1 tsp garlic powder
- ½ tsp dried oregano
- 2 large eggs
- 1 cup whole milk
- Vegetable oil for deep frying
- Salt and black pepper to taste
Instructions
- Begin by slicing off the top of the onion and peeling away the outer skin. Position the onion root-side down and make 4 vertical cuts, ensuring the root remains intact. Continue cutting between the segments until you have 16 evenly spaced petals.
- Gently immerse the onion in ice water for 10 minutes to encourage the petals to open, then thoroughly pat it dry.
- In a large mixing bowl, combine the flour, smoked paprika, garlic powder, dried oregano, salt, and black pepper, whisking them together.
- In a separate bowl, whisk the eggs and whole milk together until well combined.
- Dip the onion into the flour mixture, making sure each petal is coated. Then, immerse it in the egg wash before coating it thoroughly in the flour mixture a second time.
- Heat vegetable oil in a deep pot to 375°F. Carefully lower the onion into the oil, ensuring the root side is facing up.
- Fry the onion for 3 minutes, then carefully flip it over and fry for another 3 minutes until it turns golden brown and crispy.
- Once cooked, drain the onion on paper towels and serve it warm alongside a spicy dipping sauce.
- Prep Time: 15 minutes
- Cook Time: 30 minutes