

Soda cake is a delightful treat that combines the simplicity of a boxed cake mix with the bubbly goodness of your favorite soda. Imagine a light, fluffy cake that practically melts in your mouth, with a hint of citrus flavor that dances on your palate. It’s perfect for those weeknight dinners when you want something sweet without spending hours in the kitchen or for those last-minute potluck gatherings where you’re expected to bring a dessert. The aroma of the cake baking will fill your home with a warm, inviting scent that will have everyone eagerly anticipating the first slice.
- Why This Soda Cake Is Worth Your Time
- Main Ingredients for Soda Cake
- Tools Needed for Soda Cake
- Step-by-Step Instructions for Soda Cake
- Pro Tips for Perfect Soda Cake
- Serving Ideas and Pairings
- Variations and Swaps for Soda Cake
- Leftovers and Storage Tips
- Nutrition Notes
- Frequently Asked Questions About Soda Cake
Why This Soda Cake Is Worth Your Time
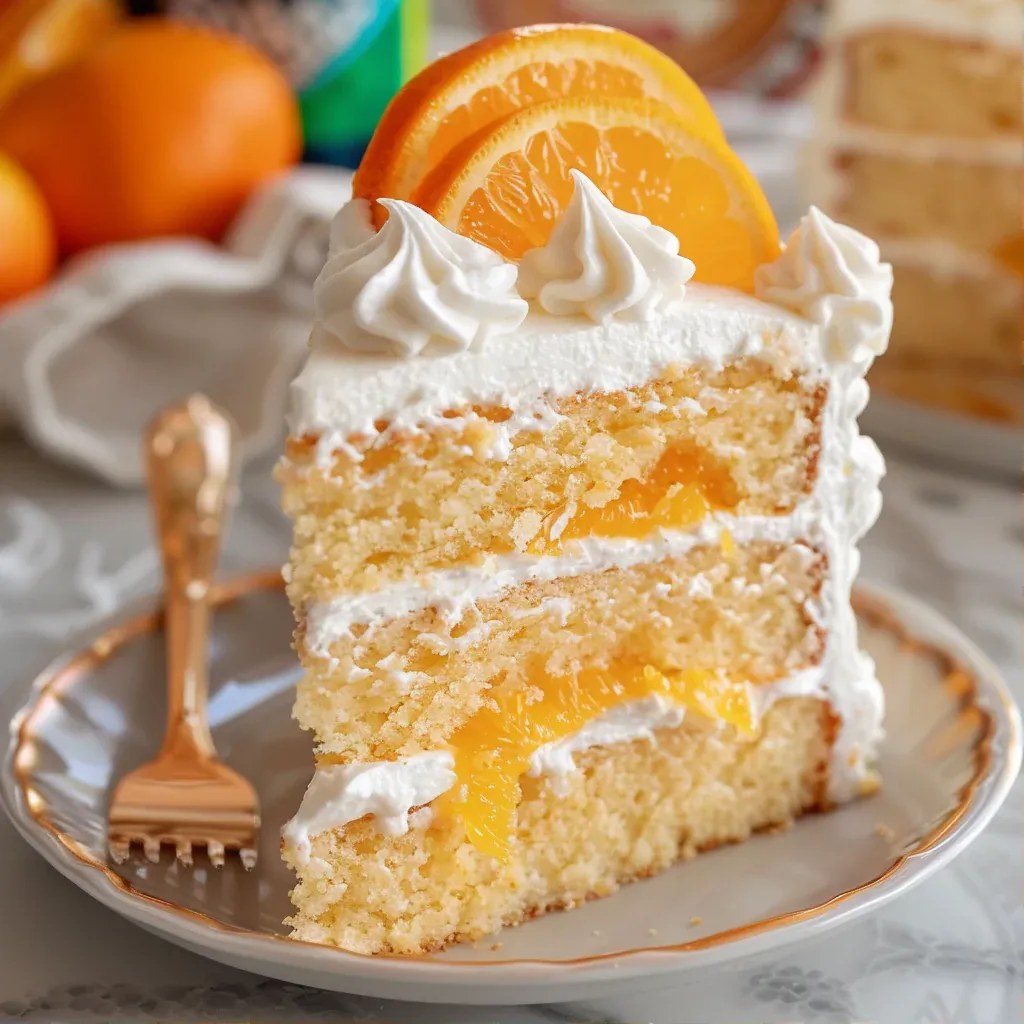
This soda cake is not only incredibly easy to make, but it also offers a fantastic flavor profile that will surprise your taste buds. The combination of the vanilla cake mix and orange soda creates a moist and fluffy texture, while the orange extract enhances the cake’s citrusy notes. It’s a budget-friendly dessert that requires minimal ingredients and equipment, making it accessible to both novice and experienced bakers. Plus, its vibrant color and delightful taste make it a showstopper for any occasion, from birthday parties to casual family dinners.
Main Ingredients for Soda Cake
Here’s a quick overview of the key ingredients you’ll need to whip up this delightful soda cake:
- 15.25 ounces vanilla cake mix: The base of the cake, providing structure and sweetness. Any brand of vanilla cake mix works well here.
- 12 ounces orange soda: This adds moisture and a unique flavor to the cake, making it light and fluffy.
- 1 teaspoon pure orange extract: Enhances the orange flavor and adds depth to the cake.
- 24 ounces whipped white frosting: This will be used to frost and decorate the cake, adding creaminess and sweetness.
- 2 to 3 drops orange gel food color: Optional, but it can be used to add a fun splash of color to the frosting.
Tools Needed for Soda Cake
| Tool | Purpose / what it helps with |
| Mixing bowls | For combining the cake mix and soda. |
| Handheld mixer | To mix the batter until smooth and well combined. |
| 9-inch round cake pans | To bake the cake layers evenly. |
| Parchment paper | To line the cake pans for easy removal. |
| Baking spray | To prevent the cake from sticking to the pans. |
| Spatula | For spreading the frosting evenly on the cake. |
| Decorator’s bag or Ziploc bag | For decorating the cake with frosting. |
Step-by-Step Instructions for Soda Cake
Making soda cake is a straightforward process that anyone can master. Follow these simple steps to create a delicious dessert that will impress your friends and family:
- Preheat the oven to 350°F. Line two 9-inch round cake pans with parchment circles, and lightly spray with baking spray (Baker’s Joy or a generic version). Set them aside.
- Add the cake mix to a medium-sized mixing bowl.
- Pour the orange soda over the cake mix. You will hear a fizzy sound as the soda interacts with the dry ingredients.
- Add the orange extract. This will enhance the orange flavor, making it even more delightful.
- Use a handheld mixer on medium-low speed and mix for 1 to 1½ minutes until completely combined and smooth. The batter should be slightly fluffy and well mixed.
- Evenly divide the cake batter between the 2 prepared cake pans. Make sure to use a spatula to scrape down the sides of the bowl for every last bit of batter. Bake for 22 to 24 minutes, or until a toothpick inserted comes away clean. Allow the cakes to completely cool.
- Once the cakes have cooled, place half of 1 of the containers of whipped frosting into a small mixing bowl. Add 2 to 3 drops of the orange gel food color. Stir well until the color is uniform. Set it aside.
- Remove 1 of the cakes from the cake pan and place on a serving dish. You can use a plate or a cake stand for presentation.
- Spoon the remaining ½ of the opened frosting container onto the cake. Using a silicone spatula or an offset spatula, spread the frosting evenly over the top of the cake.
- Carefully place the second cake layer on top of the bottom layer, making sure it is centered.
- Using the silicone spatula or the offset spatula, evenly spread the second container of whipped frosting over the top and sides of the cake. Aim for a smooth finish.
- Using a decorator’s bag fitted with a star-shaped decorator’s tip, or a quart-size Ziploc with a small corner of the bag snipped off, hold the bag ½ inch above the surface of the outer edge of the cake. Using even pressure, squeeze the bag in a circle to form a small rose shape. Repeat the pattern around the cake.
Pro Tips for Perfect Soda Cake
- Make sure your ingredients are at room temperature for the best mixing and baking results.
- Don’t overmix the batter; just combine until smooth to avoid a dense cake.
- For even baking, rotate the pans halfway through the baking time.
- Let the cakes cool in the pans for about 10 minutes before transferring them to a wire rack to cool completely.
- Feel free to experiment with different flavors of soda and extracts for unique flavor combinations.
- Use a cake leveler or a serrated knife to create a flat surface on your cake layers for easier stacking.
- Decorate with fresh fruit or sprinkles for an extra festive touch.
Serving Ideas and Pairings
- Serve with a scoop of vanilla ice cream for a delightful dessert.
- Pair with a fresh fruit salad to balance the sweetness.
- Enjoy with a cup of coffee or tea for a cozy afternoon treat.
- Top with whipped cream and orange zest for added flavor and decoration.
- Slice and serve at parties with colorful plates and napkins for a fun presentation.
Variations and Swaps for Soda Cake
Faster Weeknight Version
For a quicker option, use a single layer of the cake and frost the top only. This reduces baking time and allows you to enjoy your soda cake sooner!
Lighter Version
Swap the whipped frosting for a light whipped topping or a yogurt-based frosting for a healthier option.
High-Protein Version
Consider using a protein-enriched cake mix and add a scoop of vanilla protein powder to the batter for an added protein boost.
Budget-Friendly Version
Use a generic brand of cake mix and store-brand soda to keep costs low without sacrificing flavor.
Leftovers and Storage Tips
- Store leftover cake in an airtight container at room temperature for up to 3 days.
- If you want to keep it longer, refrigerate it for up to a week.
- For best results, freeze slices wrapped in plastic wrap and aluminum foil for up to 3 months.
- To reheat, microwave individual slices for about 10-15 seconds until warmed through.
- Thaw frozen cake in the refrigerator overnight before serving.
Nutrition Notes
This soda cake, made with relatively simple ingredients, is a fun dessert option. Each slice contains approximately 250 calories, depending on the frosting used. To adjust for dietary preferences, consider using a gluten-free cake mix or a sugar-free soda. Always check labels for allergens, and feel free to experiment with different cake mix flavors for a unique twist on nutrition!
Frequently Asked Questions About Soda Cake
What is soda cake?
Soda cake is a simple dessert made by combining a boxed cake mix with soda, creating a light and airy cake that is easy to make.
Can I use different flavors of soda for soda cake?
Yes! You can experiment with various flavors of soda and extracts to create different flavor profiles for your cake.
How long does soda cake last?
When stored properly, soda cake can last for up to a week in the refrigerator or up to three months in the freezer.
What frosting works best for soda cake?
Whipped frosting is ideal for soda cake, but feel free to use cream cheese frosting or a light whipped topping for a different taste.
Is soda cake easy to make?
Absolutely! Soda cake is one of the easiest desserts you can make, requiring only a few ingredients and minimal prep time.
Try this soda cake recipe for your next gathering or as a sweet treat for yourself. With its light and fluffy texture and delightful orange flavor, it’s sure to become a favorite. Enjoy making your soda cake and sharing it with friends and family!


Soda Cake Delight
- Total Time: 54 minutes
- Yield: 4 servings 1x
Description
This decadent soda cake delight is perfect for special occasions or when you’re craving something sweet. Made with vanilla cake mix, orange soda, and pure orange extract, it’s a treat that everyone will love.
Ingredients
- 15.25 ounces vanilla cake mix
- 12 ounces orange soda
- 1 teaspoon pure orange extract
- 24 ounces whipped white frosting
- 2 to 3 drops orange gel food color
Instructions
- Preheat the oven to 350°F. Line two 9-inch round cake pans with parchment circles, and lightly spray with baking spray (Baker’s Joy or a generic version). Set them aside.
- Add the cake mix to a medium-sized mixing bowl.
- Pour the orange soda over the cake mix.
- Add the orange extract.
- Use a handheld mixer on medium-low speed and mix for 1 to 1½ minutes until completely combined and smooth.
- Evenly divide the cake batter between the 2 prepared cake pans. Bake for 22 to 24 minutes, or until a toothpick inserted comes away clean. Allow the cakes to completely cool.
- Once the cakes have cooled, place half of 1 of the containers of whipped frosting into a small mixing bowl. Add 2 to 3 drops of the orange gel food color. Stir well until the color is uniform. Set it aside.
- Remove 1 of the cakes from the cake pan and place on a serving dish.
- Spoon the remaining ½ of the opened frosting container onto the cake. Using a silicone spatula or an offset spatula, spread the frosting evenly over the top of the cake.
- Carefully place the second cake layer on top of the bottom layer.
- Using the silicone spatula or the offset spatula, evenly spread the second container of whipped frosting over the top and sides of the cake.
- Using a decorator’s bag fitted with a star-shaped decorator’s tip, or a quart-size Ziploc with a small corner of the bag snipped off, hold the bag ½ inch above the surface of the outer edge of the cake. Using even pressure squeeze the bag in a circle to form a small rose shape. Repeat the pattern around the cake.
- Prep Time: 24 minutes
- Cook Time: 30 minutes
